


Step 1: Cut your meat up in cubes about 1-1 1/2 inches across. If the pieces are too small they kind of disintegrate and turn to little meat particles in the bottle. Too large and I don't know what would happen, but they wouldn't be as easy to eat when they come out of the bottle. There is a lot of give here--the chunks don't have to be cubes, they don't have to be 1 1/2 inches, pretty much any piece you want will do fine.
The pieces do NOT have to be cleared of all fat, tendon, hard outer meat, etc. All that will soften up in the processing and you won't know it was ever there. Get the big chunks of tendon/fat out, but don't go crazy. The first time I bottled meat I did some really nice cuts and some bottles with cuts from the ribs, neck, etc. with a bunch of tough stuff on them. I marked the bottles, but that was the only way I could tell them apart. All the meat was equally tender and delicious. Strange but true.

Step 2: Put about 1 1/2-2 inches of water in the bottom of your PRESSURE canner with the rack in and turn the burner on med/high to heat it up.

Also put some water on to boil in another pot. AND put your jar lids in a little pot of water and heat them up (no picture, but this is important--if you don't heat your lids you'll get a lot of bottles that lose liquid in the processing and subsequently won't be able to store as long).

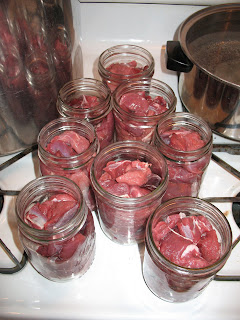
Step 3: Put the meat in clean pint jars. Fill them about to the neck. Half pints or quarts would probably work also, I've just never used them. A pint o' meat is about the right size for most things I use it for.
Step 4: Put 1/2 teaspoon canning salt in each pint.
 Step 5: Pour boiling water in the jars over the meat and salt and free the air bubbles with your bubble freer (or butter knife). Slide the knife down the edges of the jar in at least 4 locations and use it to push the meat a little--don't skip this step, lots of air gets trapped in these jars. Repeat until the water is to the neck of the jar.
Step 6: Screw the lids and rings on the jars and put them in the canner. Put the lid on the canner and the rocker on the steam pipe and heat to pressure. Process for 55 minutes (yep, that's about an hour) AT 12 lbs pressure. Now, AT pressure just means it needs to be at least 12 lbs pressure for at least 55 minutes. A little fluctuation in the pressure is okay, but if your rocker is going crazy you need to get it cooled down as quick as you can. Don't plan on going anywhere during processing--you'll need to be nearby to turn the heat up and/or down to regulate the pressure.
You might notice a couple of my lids are already marked--they are lids I used on freezer jam so they were never sealed and can be used again to seal a jar of something else (meat in this case). Once a lid has sealed, it can't be used again to seal another jar.

After the 55 minutes of pressure cooking, turn the heat off and let the canner cool down. When it's safe to open you can open it and take the jars out to cool. If you do your meat right before bed, you can go to bed as soon as the 55 minutes are done and the heat is off and just open it and get your jars out in the morning . . .

(We have serious hard water here, so my jars always look like they've got some film on them after bottling meat.)
You now have shelf stable meat that is quick and delicious to use--recipes another time . . .

6 comments:
Chris is going hunting this weekend, and I made him guarantee me a portion of his meat so I can bottle it. Wahoo!
I REALLY want to make jerky, but that will have to wait...
I've never tried this, but I might just have to one of these years. I have had bottled deer meat and I liked it. Sounds like a time consuming process though.
Emily
P.S. Add a little vinegar to your water in the pressure cooker or cold pack canner and it will eliminate the hard water on the jar. If you forget like I do, just put vinegar on a rag and it washes the hard water right off. A trick I learned from my mom.
It's not difficult, but it is time consuming, and you only get 8 pints done for your hour and a half + of canning time. I've done a whole deer once and the canner was running constantly! And hey, that vinegar idea is great--I've got serious hard water lines in my hot water canner also, although if I vinegared them off I wouldn't know how full to fill the canner anymore . . . :)
If you have a taller canner, you can carefully stack more than the 7 pints in there - ours will take 7 on the bottom row and 8 on the top row. And if we have a lot to do, we bring out a 2nd canner.
This recipe was new to me tho as we only put in about one teaspoon of water in the jar with the meat. Comes out very tender and not at all dry. Do you add the water so as to have broth? or?
Thanks!
About the time involved - by the time you clean the kitchen up and play a couple hands of cards at the kitchen table (watching the guages), it's done :)
thanks for posting this...i love to bottle my deer meat.
To get rid of the hard water marks. ALWAYS add a splash of white vinegar to your canner with the water. This will also keep your vents clear of mineral deposits. I have even found that jars that had hard water marks from canning previously, eventually lost their water marks. I love my vinegars :)
Also, I have canned chicken too, if you want it to have a prettier color, cook until 3/4 done, then take off the bone and put in jars with a little salt, and the water you boiled it in.
I use processing times from the Ball Canning book .. but not all the recipes are good tasting.
Post a Comment