


Showing posts with label food prep tools. Show all posts
Showing posts with label food prep tools. Show all posts
Thursday, December 9, 2010
Thursday, January 7, 2010
Getting Preparedness Gear on the Cheap
You all know I'm cheap. I do not like spending money and rarely buy anything new. In the wake of the free canning jar episode, I thought I'd let you all in on some other methods of finding canning supplies without paying an arm and a leg, then I thought, heck, I've gotten gear outside of canning stuff using these sources also, so even though this post started with sources for canning supplies, it's grown to sources for preparedness gear in general. And now, after following my thought process for a good three sentences, the moment you've all been waiting for . . . some of my favorite sources for preparedness gear on the cheap:
1. Yard Sales, Estate Sales, Moving Sales, Farm Auctions, etc. The estate/moving/farm sales are especially productive as folks really want to unload volume and usually aren't that concerned at making a ton of money doing it. Sometimes people don't know what they have and are willing to sell good gear for cheap. I've picked up quite a few bargains at yard sales including a large water bath canner, volcano stove, reloading press and dies, snow boots, meat slicer, tools, and firearms. Really, a great source. I try to go without my kids since they are yard sale junkies also and always want to bring home a stuffed animal or book or lava lamp (yes, I've come home from yardsales with the kids with all three of those before). Do not feel obligated to buy something just because someone's having a yard sale. This can get you into spending too much on yard sale day. Make sure it's something you need and will use. It's okay to leave a yard sale without buying anything if there's nothing there you need.
1 1/2. Thrift stores. This is usually a good place to get canning jars in Utah anyway. A little harder to find them during canning season, though. Also I've found pretty good prices on candles and you can always have a few more of those in the storage. Thrift stores go along the lines of yard sales--there's a lot of stuff there and you can end up spending more than you planned on stuff you don't really need if you don't stay focused. Thrift stores usually collect from local people, so in better neighborhoods you will find better goods at the thrift store. Our "local" thrift store is mostly recycled Kmart stuff, so I don't usually find much there for preparedness. Also, the gear will be used so if it runs on electricity (like some kitchen gadgets) make sure to check it out in the store before you buy it.
2. Freecycle or Craigslist or other local advertising method. Put a "wanted" ad in these types of services and see what kind of response you get. In our little area there is a half hour program every morning on the radio where you can call in to sell, barter, and trade items and that could be a resource as well if you're looking for something in particular. Posting flyers at your post office or other community message board works as well.
3. Work, church, other social contacts. When they've asked for announcements at church, I've gotten up and said I needed pint canning jars or whatever and have usually gotten a response from somebody with too many jars or someone willing to trade something for jars. The good part of this system is it is often free. You could use this for learning something--"does anybody know how to knit? I'd really like to learn." You can offer to trade services or other goods for whatever you're looking for, or you can offer to pay them as well.
4. Word of mouth. This kind of goes along with number 3, but includes just talking with whoever. You know, "what have you been up to?" "Well, I've been canning a bunch of stuff from the garden this week." Then if those people ever come across a stash of cherry trees that need picked or empty jars or whatever they don't have a need for, they know who cans that would appreciate any excess.
5. Relatives. I got my pressure canner and some jars from my Grandma when she quit canning in her old age and I've already got dibs on my mom's noodle maker ;) Most people do get to the point in their lives where they won't be using that rifle as much or growing and canning a ginormous garden. Let them know what you're up to and when they don't need their gear, you might get some of it. :)
6. Ask for it. We used to have a better paying job than we do now and bought ourselves some fantastic prep gear for our birthdays and Christmas. Santa might bring you something you need or you could get it for your birthday or Mother's day or whatever. If it's a big ticket item, maybe your family could all give you gift certificates to the store that sells the thing you want, or cash donations is good also. I've seriously considered the collection deal for Christmas so I could afford the gift I really wanted, but didn't think of it until it was too late. But it's a good idea anyway.
What has worked for you?
Friday, November 20, 2009
FoodSaver GameSaver Deluxe Giveaway!
In the spirit of giving, today I have another fun giveaway for you! But first a word about this giveaway's sponsor:
Ready Made Resources specializes in emergency power supplies and emergency preparedness supplies and has been in business for 15 years. They have a walk in store in the Smoky Mountains that is co-powered by solar and wind as well as their online shop. Seriously helpful folks here. And until November 30th they're also having a fantastic 25% off sale on their Mountain House freeze dried foods and free shipping on cases--check out their ad on the right sidebar!
Now, you all know I love my FoodSaver. It is an amazing machine. I use it for packing food for the freezer and foods I've dehydrated to prolong their useful life. I use it to pack clothes for our Emergency Kits. You should see the compact package it makes when you vacuum pack diapers! I know you all want one or know someone who does.
Well, the folks at Ready Made Resources are feeling just that generous and have offered to send one of my readers a FoodSaver GameSaver Deluxe that retails in their store for $149.95. Okay, I'll admit it. I want it. My 10 year old FoodSaver's got nothing on this machine.

Here's the Product Information:
FoodSaver® V2440 Advanced Design
The FoodSaver® Advanced Design series. It improves upon favorite FoodSaver features like Hands-free operation -- now at the touch of a button. It introduces never-before-seen features like variable speeds for different size bags and canisters, and food-specific settings that ensure a secure seal for dry or moist food. It even has a CrushFree™ Instant Seal feature so that, for the first time ever, you can immediately stop the vacuum process when vacuum packaging delicate foods. And it is Sleeker because it combines function and beautiful form with features like an easy-to-use and easy-to-clean flat Touchpad Control Panels.
Product Features:
So here's the instructions to sign up for this giveaway. You are welcome to leave a comment on this post, but it won't count toward the giveaway. :) To enter, you'll need to fill out the form.
For your first entry, put your name and email in the form. This is required for entry in the giveaway. If you don't want to put your real name in the name slot, I guess that's okay, put whatever you like to be called in that space. The winner will be contacted by email, so put an email you actually check in the email spot. You email won't go anywhere else. Promise.
Additional entries are available for the following:
1. Become a follower of Adventures in Self Reliance (you know my posts are worth reading!)
2. Follow Adventures in Self Reliance in a feed reader (or by email feed subscription)
3. Share this giveaway via a post on your blog (make sure to link to the giveaway and leave the link to your post in the form)
4. Twitter a link to this giveaway (include @momof3angels in your tweet and put your twitter username in the form)
5. Share this giveaway by some other method like facebook or email your friends
The giveaway will end on Thursday, December 17th at 5:00 pm MST and the winner will be contacted by email for their shipping information. If you respond quick, you should be able to have this FoodSaver in hand by Christmas! Good luck! (And yes, I'm having fun with the form generator.)
Ready Made Resources specializes in emergency power supplies and emergency preparedness supplies and has been in business for 15 years. They have a walk in store in the Smoky Mountains that is co-powered by solar and wind as well as their online shop. Seriously helpful folks here. And until November 30th they're also having a fantastic 25% off sale on their Mountain House freeze dried foods and free shipping on cases--check out their ad on the right sidebar!
Now, you all know I love my FoodSaver. It is an amazing machine. I use it for packing food for the freezer and foods I've dehydrated to prolong their useful life. I use it to pack clothes for our Emergency Kits. You should see the compact package it makes when you vacuum pack diapers! I know you all want one or know someone who does.
Well, the folks at Ready Made Resources are feeling just that generous and have offered to send one of my readers a FoodSaver GameSaver Deluxe that retails in their store for $149.95. Okay, I'll admit it. I want it. My 10 year old FoodSaver's got nothing on this machine.

FoodSaver® V2440 Advanced Design
The FoodSaver® Advanced Design series. It improves upon favorite FoodSaver features like Hands-free operation -- now at the touch of a button. It introduces never-before-seen features like variable speeds for different size bags and canisters, and food-specific settings that ensure a secure seal for dry or moist food. It even has a CrushFree™ Instant Seal feature so that, for the first time ever, you can immediately stop the vacuum process when vacuum packaging delicate foods. And it is Sleeker because it combines function and beautiful form with features like an easy-to-use and easy-to-clean flat Touchpad Control Panels.
Product Features:
- Improved Hands-free Operation – Vacuums, seals, and shuts off automatically with a single touch
- Improved Easy-clean Antibacterial Drip Tray – Removes easily, dishwasher safe. Extra deep and antibacterial
- Improved Built-in Roll Holder and Cutter – Simplifies making custom-sized bags
- New Extra-wide Sealing Strip with Non-stick Coating – Provides extra secure, airtight seal that’s two times wider
- New Two Speed Settings – Optimize vacuum speed for different size bags and canisters
- New CrushFree™ Instant Seal – Immediately stops the vacuum process to prevent crushing
- New Easy-lock Latch – Latches lid tight, securing bag for vacuuming and sealing
- New Adjustable Food Settings – Change seal level for type of food – moist or dry
- New Control Panel – Easy to clean and makes vacuum packaging easier than ever
- New Pen Storage – Stores pen under lid for dating and labeling bags
- New Canister Mode – Achieves the best vacuum on canisters and accessories
- Accessory Hose Storage – Keeps Accessory Hose handy and protected
- Port – Allows vacuum packaging with FoodSaver Canisters and Accessories
- Full-sized Vacuum Channel – Catches overflow liquids and fits any size FoodSaver Bag for maximum versatility
- Indicator Lights - Tracks sealing progress
So here's the instructions to sign up for this giveaway. You are welcome to leave a comment on this post, but it won't count toward the giveaway. :) To enter, you'll need to fill out the form.
For your first entry, put your name and email in the form. This is required for entry in the giveaway. If you don't want to put your real name in the name slot, I guess that's okay, put whatever you like to be called in that space. The winner will be contacted by email, so put an email you actually check in the email spot. You email won't go anywhere else. Promise.
Additional entries are available for the following:
1. Become a follower of Adventures in Self Reliance (you know my posts are worth reading!)
2. Follow Adventures in Self Reliance in a feed reader (or by email feed subscription)
3. Share this giveaway via a post on your blog (make sure to link to the giveaway and leave the link to your post in the form)
4. Twitter a link to this giveaway (include @momof3angels in your tweet and put your twitter username in the form)
5. Share this giveaway by some other method like facebook or email your friends
The giveaway will end on Thursday, December 17th at 5:00 pm MST and the winner will be contacted by email for their shipping information. If you respond quick, you should be able to have this FoodSaver in hand by Christmas! Good luck! (And yes, I'm having fun with the form generator.)
Tuesday, November 17, 2009
Using a Wonderbox Style Insulated Cooker
This post has moved to my new blog location. Click here to go to Using a Wonderbox.
Wednesday, November 4, 2009
Cookies in the Sun Oven
I've borrowed a Sun Oven from a sweet friend, and since it's been sunny, I've been out experimenting with it a bit. I got it out Monday, intending to cook some bread in it since I was baking bread anyway, but it had never been out of the box, and the instructions say to let it heat up and then cool down and wash the interior before baking in it (you know, to burn off the "new" fumes), so that's how Monday's baking went--all the bread just went in the regular oven.
Tuesday was nice and sunny, so I busted the sun oven back out to bake some cookies. Here it is all set up in my yard:
 After 20 or so minutes, it had heated up to about 310 degrees. Really. All you skeptics out there that think it would take two hours to heat up a solar oven, it really did heat up in 20 minutes. Here's the thermometer:
 And just for good measure, here's a photo of the back of the sun oven with the height adjustment leg to enable you to aim it right at the sun. EASY.
 I made my husband's favorite oatmeal cookies and put a pan of them in the oven. The cooking chamber isn't extremely large. I used a smallish pan instead of my regular cookie sheets.
 This cookie recipe is 350 for 10 minutes, so I checked at 10 minutes and the cookies weren't quite done (of course, since the heat level was lower than 350).
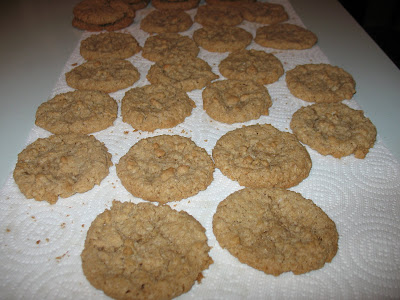
 Here's how we looked at 15 minutes. Done. Actually a little overdone--they were a bit dry. Not burned, just a bit dry. I pulled the second batch out a little sooner with better results.
 That's steam coming out the top of the door when I opened it. Yep, it gets that hot in the oven.
 The cookies were delicious, and cooking in the sun oven was easy. I'm definitely sold. I'll be trying something else this week before I have to give the oven back. :)
Tuesday was nice and sunny, so I busted the sun oven back out to bake some cookies. Here it is all set up in my yard:
 After 20 or so minutes, it had heated up to about 310 degrees. Really. All you skeptics out there that think it would take two hours to heat up a solar oven, it really did heat up in 20 minutes. Here's the thermometer:
 And just for good measure, here's a photo of the back of the sun oven with the height adjustment leg to enable you to aim it right at the sun. EASY.
 I made my husband's favorite oatmeal cookies and put a pan of them in the oven. The cooking chamber isn't extremely large. I used a smallish pan instead of my regular cookie sheets.
 This cookie recipe is 350 for 10 minutes, so I checked at 10 minutes and the cookies weren't quite done (of course, since the heat level was lower than 350).
 Here's how we looked at 15 minutes. Done. Actually a little overdone--they were a bit dry. Not burned, just a bit dry. I pulled the second batch out a little sooner with better results.
 That's steam coming out the top of the door when I opened it. Yep, it gets that hot in the oven.
 The cookies were delicious, and cooking in the sun oven was easy. I'm definitely sold. I'll be trying something else this week before I have to give the oven back. :)
Monday, July 20, 2009
Grinding Corn in the Country Living Mill
I had an email asking how fine the Country Living Mill could grind corn on two passes, and thought you'd be interested in the results also. I installed my corn/bean auger and ground some corn. I set it as fine as I could comfortably turn it and ran the corn through one time. At this setting, my 8 year old could turn it, but just barely. The picture shows Redmond Realsalt (table salt consistency) on the top and the ground corn on the bottom.  The corn is actually finer than the salt, but you could adjust the knob to a little grittier consistency if you don’t want it quite that fine. It is a little harder turning than grinding wheat and doesn’t crank out as much flour with each turn, but I was able to grind it fine. No need to run it through the mill a second time.
 The corn is actually finer than the salt, but you could adjust the knob to a little grittier consistency if you don’t want it quite that fine. It is a little harder turning than grinding wheat and doesn’t crank out as much flour with each turn, but I was able to grind it fine. No need to run it through the mill a second time.
Wednesday, April 15, 2009
Wheat Practically Grinding Itself . . .
A little update: I have in the past ground my wheat and then taken the grinder down and put it away, but when I did the Country Living Grain Mill post, I thought I'd leave it up since I wanted to grind a few more things. Well, I keep having to stock it up with wheat because the kids keep turning the wheel when they're in the kitchen. Every time I walk by there's more flour in the bin! Even caught them letting their friends have a turn at it (yep Sharla, your boys ground my wheat also!). This is working out well . . . they're grinding all the wheat and I haven't had to make it a chore! :) You know you want one of these!
And coming soon to a blog near you: Firearms education installment 2--ammunition basics, seed starting, and my new chick house!
And coming soon to a blog near you: Firearms education installment 2--ammunition basics, seed starting, and my new chick house!
Saturday, April 4, 2009
Country Living Grain Mill Review and Sale
I am so excited to let you all know that I am now a dealer for Country Living Grain Mills! If you have not heard of this particular grain grinder, you are gonna hear all about them by the end of this post! What? You already know about them and have just been waiting for me to become a dealer for you to purchase one? (How sweet of you!) Well, you can click the button on my sidebar, or head right over here and get busy. The rest of you that need convincing, read on. We'll cover technical details first. Country Living Grain Mills are manufactured in Stanwood, Washington--yes, that's right here in the good ol' USA. Tough to find much made around here these days. These industrial quality mills are made of high quality, long lasting materials--no plastic--and are designed to last many lifetimes. The grinding plates are steel, so there's no bits of stone in your flour, but they grind flour from a variety of grains as fine as any stone wheel can and with 30% LESS effort than other hand grain mills. You can set the coarseness from fine flour to cracked grains (can't do that with an electric impact grinder). AND it will work when the electricity doesn't. Here's flour coming out of my mill last night (I wasn't the one cranking the handle--can you guess who was?)
 The body is hand cast solid aluminum. The large flywheel is designed to attach easily to a motor or exercise bike--the designer of the mill hooks his mill to his exercise bike and calls it his "well-being machine." (I would love to do that with mine . . . I just need an exercise bike and my little room in the shop finished.) The shaft runs on sealed bearings for easy turning, and with a steady crank, the mill can put out more than 7 cups of flour in 19 minutes. And did I mention how easy to crank this mill is?
AND, the hopper holds 2 lbs of wheat so you won't be getting off your exercise bike and refilling the grain every half block!
Now, here's my story. I own this grain mill and have had mine for 7 or so years and it works as well now as the day I bought it. It is fantastic. I will admit that I have not used it as much as I could have. I have primarily ground beans and wheat in it. It has never been hard to grind, but it is more workout than pushing a button on an electric mill for sure!
 We'll cover technical details first. Country Living Grain Mills are manufactured in Stanwood, Washington--yes, that's right here in the good ol' USA. Tough to find much made around here these days. These industrial quality mills are made of high quality, long lasting materials--no plastic--and are designed to last many lifetimes. The grinding plates are steel, so there's no bits of stone in your flour, but they grind flour from a variety of grains as fine as any stone wheel can and with 30% LESS effort than other hand grain mills. You can set the coarseness from fine flour to cracked grains (can't do that with an electric impact grinder). AND it will work when the electricity doesn't. Here's flour coming out of my mill last night (I wasn't the one cranking the handle--can you guess who was?)The body is hand cast solid aluminum. The large flywheel is designed to attach easily to a motor or exercise bike--the designer of the mill hooks his mill to his exercise bike and calls it his "well-being machine." (I would love to do that with mine . . . I just need an exercise bike and my little room in the shop finished.) The shaft runs on sealed bearings for easy turning, and with a steady crank, the mill can put out more than 7 cups of flour in 19 minutes. And did I mention how easy to crank this mill is?
AND, the hopper holds 2 lbs of wheat so you won't be getting off your exercise bike and refilling the grain every half block!
I'm sure I left something out--check out Country Living's site if I didn't discuss something you want to know--they probably have the answer there!
And Click here for testimonials on the Country Living Grain Mill. Ready to purchase one yet?
In planning our food storage, we plan for the worst case scenario, which for us includes no electricity. So when we went looking for a grain mill, we did not want an electric grinder that wouldn't work when we needed it to. We did A LOT of research into different hand grinders, and found that many of the lower priced mills were unreliable (some didn't work right out of the box) or didn't last very long under regular use--again, not what we wanted to have around when our lives depended on it. After much research and deliberation, we decided on the Country Living Mill. We purchased the nut/bean auger and the power bar with it (I'll cover all the options in a little bit), and have never regretted the purchase.
This is NOT a cheap grain mill--they retail for between $395 and $409, but the comfort of knowing you have a quality mill that will last and serve your family when it will matter most is worth that to me.
Last night, we ground some wheat and made cookies with it. In the videos, I have the power bar on my mill (which makes turning even easier) and do not have it set on the finest setting (but pretty close). We ran the wheat/flour through twice to get the fineness I wanted and make it easy enough for my 4 and 7 year old to turn without any trouble. I DID NOT GRIND ANY OF THE FLOUR LAST NIGHT. Hey, if my 4 year old can do it, I bet you could crank this mill. (Oh yeah, they did their own hair.)
Ready to buy one yet? Head on over!
Did I mention I can take Visa and Mastercard securely when you purchase through my link?
And your mill will ship to your door absolutely free!
Now, a bit about the accessories that are available for the mill in no particular order and with descriptions copied from Country Living's website (my comments in parentheses).
1. The Power Bar. Reduce the effort of grinding grain by 40%! This steel extension attaches quickly and easily to the flywheel of your Country Living Grain Mill, creating more torque and making for an easier grind. (This is what makes it so easy for your kids to help!) 2. Wall Mount Kit. (If you're real crafty, you can probably just make this yourself.) If you don't have any available counter space the Country Living Wall Mount Kit offers an easy and effective solution to your dilemma. Comes with pre-drilled holes and equipped with the necessary hardware to mount your mill and shelf to the wall. It is designed to be mounted to a single stud, or into two studs spaced at standard 16" centers. natural wood.
 3. Corn and Bean Auger. Now your Country Living Grain Mill can be even more versatile! Use the large auger to mill corn, beans, and coffee. To use, simply replace the standard spring auger with this larger auger. The large auger is cast from stainless steel. (You'll want this if you're planning on grinding cornmeal or bean flour.)
 4. Grinding Plates. With normal, one-family use, your plates should last 3-4 years. Is it time for you to order a replacement set? Your Country Living Grain Mill will be an essential, life-sustaining product during times of emergency. Having a spare set of grinding plates on hand will give you peace of mind. Be prepared and order a set today!
 5. High Impact Polymer Bin with Lid. This beautiful, clear bin with etched wheat pattern is designed to fit snugly underneath your Country Living Grain Mill hopper. After grinding, simply place the protective lid on the Country Living Bin for perfect storage of your freshly ground flour. This attractive bin has an 8-cup capacity! (I use a bread pan to catch my flour, but it doesn't hold as much as this bin does.)
 6. Motorization Kit. While there is still power, motorize! The motorization kit includes 1" wooden baseboard, motor with pulley, belt and belt guard, and miscellaneous hardware (washers, screws, Allen wrench).
 7. Country Living Case. This handsome hand-stained hardwood case is perfect for storing your Country Living Mill accessories. It will hold an extra set of Grinding Plates, the Corn & Bean Auger, the Power Bar Extension Handle, and the Just-in-Case Repair Kit. This case comes empty, and does not include any accessory parts.
or Complete Country Living Case (with all the stuff). Get the Country Living Grinding Plates, Corn & Bean Auger, the Just-in-Case Repair Kit, and Power Bar Extension Handle together in a handsome, hand-stained hardwood case at no additional charge. 8. Just In Case Repair Kit. Includes 2 replacement bearings, proper size bolt, nut, 2 custom-cut washers to match bearings while pressing, 12 standard washers, stainless steel spring auger, snap ring, 2 long keys, and 2 short keys. (and instructions).
 9. Hopper Lid. Keep the hopper of your Country Living grain mill clear of dust and hungry rodents with this handsome lid constructed from natural wood. Designed to fit snugly inside the lip of the hopper. (Again, if you're crafty, you could probably make yourself one of these.)
Saturday, March 28, 2009
Cleaning Out the Freezer and Ode to My Foodsaver
Spent most of yesterday cleaning out our two freezers. I think Someone's been hearing my grumblings about eating elk for every meal, because in the last two weeks we've been given ground beef (yep real beef, not ground venison or elk) and various cuts of pork from other people's freezer cleanouts. And this last round we had no place in the freezer to put it, so I figured it was time to clean out the real old stuff from the freezers and figure out why we couldn't fit even a jug of ice cream in. It was a cold day, but got it done, and here's the one freezer.  What is that??? A shelf with nothing on it??? Unbelievable! We are cooking up very old elk/moose/buffalo/deer/antelope meat and sausage that is crazy freezer burnt for the dog a little at a time, so I actually had to put some of the old stuff back in on that bottom shelf. Defrosting packs of jerky cut meat plus some old roasts to be cut into jerky, so that will get done in the next day or two.
Now, the Ode to My Foodsaver (and last night's dinner):
Foodsaver, foodsaver, You amazing machine.
You made edible 7 year old beans of green.
8 year old elk steaks were delicious too,
Not all freezer burnt and covered with frosty goo.
And the 2 year old peach pie filling was also yummy--
Quickly devoured into every child's tummy.
Okay, cheesy, I know, but the food packed in my foodsaver kept way better than the food packed by the butcher in the white paper. Just my observations . . .
Now, it's a beautiful day here so I'm going outside to do some yardwork! Have a great weekend! :)
What is that??? A shelf with nothing on it??? Unbelievable! We are cooking up very old elk/moose/buffalo/deer/antelope meat and sausage that is crazy freezer burnt for the dog a little at a time, so I actually had to put some of the old stuff back in on that bottom shelf. Defrosting packs of jerky cut meat plus some old roasts to be cut into jerky, so that will get done in the next day or two.Now, the Ode to My Foodsaver (and last night's dinner):
Foodsaver, foodsaver, You amazing machine.
You made edible 7 year old beans of green.
8 year old elk steaks were delicious too,
Not all freezer burnt and covered with frosty goo.
And the 2 year old peach pie filling was also yummy--
Quickly devoured into every child's tummy.
Thanks for the food found at the freezer's back
That we could still eat thanks to how well you pack.
Okay, cheesy, I know, but the food packed in my foodsaver kept way better than the food packed by the butcher in the white paper. Just my observations . . .
Now, it's a beautiful day here so I'm going outside to do some yardwork! Have a great weekend! :)
Monday, January 19, 2009
Used vs. New Canning Lids
 Here's a quick post to answer a question my sister had: How can you tell the difference between used and new canning lids? There are a few ways to tell. First, the new ones are in a box and second, the used ones have the date sharpied on them :) However, if you used lids on freezer jam, they aren't in the box and have a date sharpied on them, but they are still not USED. And sometimes new lids get mixed in with old lids in the sack/box/wherever you keep your canning goods. And sometimes you might not have marked the lids. So here's a better method. Turn them over and look at the gummy stuff around the rim. If it's smooth like this one, it has not been sealed and is good to use to seal a jar.
If it has a deep jar rim indentation in the gummy stuff, like this one, it has already been sealed and cannot be used again.
 Sometimes if the lid has been on a jar like for freezer jam, or if you store your empty jar with a lid on it and the gummy side has been against the jar rim, it will have a slight indentation in the gummy stuff, but it's still good to use. It will not be as deep an indentation as a lid that has sealed. Hope that helps!
Thursday, January 8, 2009
Yard Sale/Thrift Store Shopping List
I usually have a list in the back of my mind when I go to a yard sale or thrift store of things I'm looking for. I guess it would be better to have it written down and keep it in my wallet or purse so if I get a chance to stop by somewhere I'll know what to look for. Always check the item's condition. A $3.00 backpacking stove is useless if it doesn't work. Any preparedness item is fair game and you never know what you'll find at a yardsale that might not be on your list, so keep an open mind, but here's a few things to watch for if you don't already have them:
Kids clothes/shoes/snow gear/coats/etc. in good condition. Even if they're 2 sizes too big, KIDS GROW! I have a box or 2 for each of my kids to "grow into" and every spring/fall we bring it out and shuffle clothes around.
Camping/Outdoor Gear--propane/gas stoves, tent, fishing poles, etc. I got a volcano stove and accessories at a yardsale once for $40, the one we bought new was $129 without any extras!--now it sits in my storage waiting to be used (guess maybe I should get it out and practice with it).
Firearms/Shooting stuff (this is my dream yardsale!). Unusual to find guns for sale, but every once in a while someone is wanting to sell one. We had a yard sale once and someone asked if we had any guns, (of course we weren't telling or selling) so I guess it doesn't hurt to ask even if you don't see any. I have seen a trap thrower, reloading press/dies/scale, boxes of shotgun shells, you just have to keep your eyes open.
Cast iron or other heavy pots/pans, dutch ovens--great for outdoor cooking.
Old candles--light is always good, but even if you can't use them for a candle, you can always melt them down for egg carton/lint firestarters or tuna can stoves. (we'll discuss these another time)
Canning and Food Preservation--canners, jars, canning tools, dehydrator, meat grinder, etc. I've seen all this and bought a lot of my own canning/food gear at yard sales.
Tools. Even crazy old timey tools--we just got a forge from a farm auction in Denver (My husband knows what to do with it--I think I'd just have to put a board over the top of it and make it into a table.)
NON ELECTRICAL entertainment. Board games, etc. If the power's out, you'll need something to do!
Fabric. This is because I love to sew, but it wouldn't hurt anyone to have a few yards of good heavy fabric around to repair pants, tents, whatever with, and fabric at yardsales is amazingly cheap! I sew reenactment clothes and made me a skirt once from a chunk of fabric I got for 35 cents! I love it! (Reenactment clothes already made cost WAY more than 35 cents!)
This is not a comprehensive list. Keep in mind any gear you might be looking for at the time you hit the sale. At one point we were looking for an old wood stove. Now we found one and we're looking for triple wall pipe to go with it so we can install it.
Not sure why I'm dreaming about yard sales in the dead of winter . . .
What's on your list?
Saturday, November 15, 2008
Canning Tools
If you're going to can your own food, you'll need some tools. Don't worry, the list isn't long and I'll put in pictures also so you know what you're looking for.
First a canner.
High acid foods like fruits, jams/jellies and tomatoes can be bottled in a Water Bath Canner or Boiling Water Canner (both the same thing). It's basically a big pot with a lid and a rack to raise and lower the jars.
 Low acid foods like vegetables and meats require a pressure canner. This canner has a lid that seals and has a pressure regulator on the top. It is nothing to be afraid of! Don't leave it unattended, follow the directions, and you'll be fine.
 A canning funnel is a must for making things easier and less messy. Seen here in action, it is a wide funnel that fits inside the jar opening. Perfect for loading your produce into jars. An absolute necessity for jams and syrups.
 The jar lifter is also a requirement. Use it to pull hot jars out of the canner.
 There are other tools like a magnetic lid lifter for pulling lids out of hot water to put on your jars, and a plastic bubble freer spatula thingy to get air bubbles out of jars before canning, but I've managed to get by quite comfortably just using a fork to lift my lids and a knife to free my bubbles, so if you want those other tools, go ahead and get them, they are probably nice, just not necessary.
Last is a cooling rack. The jars cool off best when air can get under them. If you don't have a real cooling rack that is large enough, you can make one (or two) with your oven racks. Take out an oven rack and turn it over. Then find something to prop up the opposite side that holds the rack about level. My mom used kids' wooden blocks to hold hers up. My rack fits just right with a plate inverted holding up the other side. Easy and one less piece of equipment to keep around!

Oh yeah, don't forget jars, lids and rings of your choice. I've gotten my jars at yard sales, thrift stores, and from people who don't can anymore, so I have a variety of sizes and some of each wide and narrow mouth. If I were to purchase all my jars, I'd decide on either wide (more expensive, but easier to load) or narrow (less expensive) and get all of one kind so then I'd only have to buy one kind of lid and rings. Just easier that way.

Oh yeah, don't forget jars, lids and rings of your choice. I've gotten my jars at yard sales, thrift stores, and from people who don't can anymore, so I have a variety of sizes and some of each wide and narrow mouth. If I were to purchase all my jars, I'd decide on either wide (more expensive, but easier to load) or narrow (less expensive) and get all of one kind so then I'd only have to buy one kind of lid and rings. Just easier that way.
You may be able to find some or all of this stuff cheap at yard sales or estate sales. Thrift stores can also be a good source (outside of Utah).
There you have it. If I think of anything else, I'll add it, but that's about it for canning tools.
Thursday, November 13, 2008
Dehydrator

A dehydrator is a fantastic tool for food preservation. I have used mine to dry green beans, corn, zucchini, tomatoes, apples, apricots, strawberries, herbs, actually anything that gets in my way when the dehydrator is out has the chance of being tossed in the dehydrator and dried.
I have only owned one dehydrator--it is an Excalibur and I love it. Here's the pros and cons:
Pros:
It's really big--I can dry lots of stuff at one time.
Adjustable Temperature.
Timer (this way I can dry stuff while I'm sleeping and it doesn't get too dry).
I can dry large items by leaving some trays out to make more space for what I'm drying.
The heater/fan is in the back instead of on the bottom--the bottom is smooth so it is really easy to clean up.
The trays can go in the dishwasher (top rack only I think).
Cons:
It's really big--so if I'm only drying a small amount of stuff, the dehydrator is the same size as if I'm drying lots of stuff.
The internal temperature is not as even as it is advertised, so I do rotate trays from the top and bottom toward the middle about half way through the drying process, although you'd have to do this with a stacking type dehydrator also. The rotating process is really simple--I just pull out the two trays I want to swap and stick them back in opposite locations.
Umm . . . . I guess that's all for cons that I can think of. Overall it's a fantastic product.
Looks like the model I have with 9 trays and a timer goes for $249-299 right now depending on where you get it--YIPES! But I've had and used mine for about 9 years and it's just as good as when I first got it--I don't expect I'll ever need another dehydrator. Here's Excalibur's site for more information: http://www.excaliburdehydrator.com/
Wednesday, November 12, 2008
Apple Peeler/Corer/Slicer
 Here's the apple peeler/corer/slicer I use. It is a Back to Basics brand and clamps to the countertop. I've been told you can get a version of this through Pampered Chef as well. When the handle part is pulled back you stick an apple on the prongs with the prongs going into the core from the bottom or the top of the apple with the opposite end aimed toward the coring circle. Then just start turning the handle (kids love this job) and it peels, slices and cores the apple as it goes through the blades. Slick! Makes apples for pies, apple crisp, dehydrating, etc. fast and easy.
Subscribe to:
Comments (Atom)
