Showing posts with label meat. Show all posts

Thursday, December 10, 2009

Product Review: Best Prices Signature Canned Meats

In planning our food storage, one area that's caused some trouble is meats.  Now I know meats aren't on the "wheat, beans, powdered milk, and honey" plan, but I like meat.  So does my sweet husband.  So do my kids.  I really want some in my food storage.  The standard way to store meats is to have some in the freezer.  This works fine if your electricity doesn't go out or if it does and it's real cold outside and you can just pile your frozen stuff in the snow to keep it frozen.  But it's not the best way to store meats, especially long term--frozen meats that are not packed just right develop a bad case of freezer burn.  So if you have meat in your freezer, what's your backup plan?

Your other options are to buy freeze dried meats or canned meat.  Neither are cheap, and I've not had great experience with freeze dried meats (maybe because it wasn't great meat before it was processed?)  Now we come to canned meats.  Canned meats are a good thing.  Most people's canned meat storage consists of tuna fish or spam.  Yep, I have a case or two of tuna fish.  I despise tuna fish.  I don't have any spam--I really despise spam.  I also bottle meat from the hunts.  I have some canned chicken in the squatty fat cans that I'm not real crazy about because it's super processed, chunked and formed hunks of meat that was formerly chicken in a can with lots of water.  Got all that?  Sounds delicious, right?  Well, here's where our review comes in.

Internet Grocer/Best Prices Storable Foods sent me some of their canned meats to try.  I received a sample pack with canned chicken, turkey, beef, pork, and ground beef.

The first one we tried was the beef.


This is the large 28 oz. can.  Each of the meat varieties are available in large cans or smaller 14.5 oz cans.  Here's the open can.


One of the great things about Internet Grocer's canned meats is that they are not packed in a bunch of water.  The ingredients say: "Beef, salt"  That's it.  So the juice in the can is just juice from the meat being processed.  The meat also comes from hormone-free animals.  I'm already liking this stuff.

The pieces of meat are stiff enough you could put them in a stew or casserole if you didn't smash them up, but they shred really easy, so I made chimichangas with it.  Now we come to another great thing about canned meats in general: they are ready right now.  You could open the can and eat them cold if you wanted to (which I did with some of this beef).  I used a recipe that said to cook your meat 2 HOURS so you could shred it, but it only took about 30 seconds to open the can instead (perfect for dinner procrastinators).  Ahhh, chimichanga filling in 10 minutes or less:


I tasted this beef cold, warm, and all mixed up in my sauce and it was good every time.  I'm pretty sensitive to the taste of preservatives, maybe since most of the food we eat around here is "from scratch", and I could not tell this beef wasn't from a roast I cooked in my crockpot all day.  I was also concerned about the salt--I want my meat to taste like meat, not salt (think spam), but the canners got the salt level just right--enough to enhance the flavor, not so much that you taste salt.  Nice work.  And I don't recall seeing canned beef on the shelf at the grocery store, but maybe I just haven't looked.

Ditto on the pork.  It was really good.  Packed in its own juices, not too salty.


This is one of the small cans.  Nice size for one meal for an average family (actually went farther for us).  Here's a picture of the pork right out of the can:


See how you can see the grain of the meat?  Yep, you know it's real meat.  I also ate this cold, and warm.  We made barbeque pork sandwiches.  Really, you don't have to shred this canned meat to eat it, I've just been on a shredded meat kick lately.  You know the pulled pork sandwiches that take all day in the crockpot to get the pork to shred?  Here's the same thing in 10 minutes--and it only took that long because I was making the sauce up as I went:


It was fabulous.  Even sweet husband liked it.  I liked the taste, the texture, and the ease of cooking with it.  And who has canned pork?  That's another one I haven't seen at the store.

The only issue I had with the meat was the price.  I'll admit it, I'm cheap.  Really cheap.  So a large can of meat for between $8.45 and $9.10 seemed kind of steep.  But here's the deal.  It's a very large can of meat.  The can of beef easily made 2 meals for our family (actually more since sweet husband's been sick and not had his whole appetite) as chimichanga meat.  If it were in a stew or casserole it would have gone even farther.  And the meat is really good.  Not all processed and watery like the squatty cans of chicken that I pay $2.50 for.  So if I stacked those chicken cans up to equal the size of one of Internet Grocer's large cans it would be $7.50 (3 cans high), then if I squeezed all the water out of those cans I'd need another can to make the same amount of meat, so now we're up to around $10.00 for a comparable amount of meat and who knows where that meat came from or how it was processed.  So you see it's not so expensive after all. :)

So if you're looking to round out your food storage with some quality meats that will store 5 years or more, (or if you've procrastinated on getting the prepper on your list something special for the upcoming holiday) head on over to Internet Grocer and pick up some of their Signature Canned Meats.  They have my approval.

As required by the FTC: I received a sample pack of Best Prices Signature Canned Meats in order to write my review. I received no monetary compensation.  You know if I review something it will be thorough and honest, so the opinions expressed here are my own honest opinions.

Thursday, November 5, 2009

More Sun Oven Cooking

Last night's dinner: Ribs and rice cooked in the Sun Oven. Amazing. You need one of these. And I'm a dealer for them. Shoot me an email or use the link on the right side to order :)

Monday, August 17, 2009

Bottled Meat Stroganoff

Here's one of my favorite bottled meat recipes. It is so fast and easy it's almost unworthy of a post of it's own, but seeing as school doesn't start for another week and archery season is on and I'm still doing laundry from the two camping trips, an easy post is all you get ;)

Remember the bottled meat? This could be any meat--I especially like deer/venison. Elk is good also--it gets a little softer in the bottle, where the venison holds a little firmer texture. I've seen people bottle beef before also--I have to buy beef, so buying it to bottle has never appealed to me when I can get a deer or elk during the hunting season and bottle that instead. I also really like a beef roast and beef steaks, where venison roast or steaks about make my stomach turn. So, long story short, you can bottle whatever meat you want, but for me, it's an especially nice way to preserve game meat.

So here's what you need for Bottled Meat Stroganoff:
1 pint bottled meat
1 beef bullion cube
2 cups (16 oz container) sour cream (more or less to taste)
a couple heaping spoonfuls of flour
noodles of your choice--I like the wide or medium egg noodles with this dish
A cup or two of milk to thin the sauce

Step 1: Put some water on to boil for your noodles.
Step 2: Scoop the sour cream in a separate pot and mix the flour into it so it's all creamy again.
Step 3: Add the whole bottle of meat including the juice and the bullion cube to the sour cream mixture and stir it up. Kind of break up the meat chunks as you stir it. Start the heat on the meat pot. If you like mushrooms, you could add some of those to the sauce also.
Step 4: Whenever your water boils, add your noodles and cook until they're done.
Step 5: As the meat mixture cooks and thickens, add some milk to make it the consistency you want. Salt and pepper it if you want also--I don't, but I kind of like things unsalted and unpeppered.
Step 6: (no picture, sorry--I was eating) You can mix the sauce into the cooked noodles, or serve the sauce over the noodles.

Sauce and noodles are generally done about the same time--15 minutes or so.

There you have it. Quick, easy, yummy bottled meat dinner :)

Thursday, January 22, 2009

Making Gravy from a Liquid

Gravy is a necessity with meat at my house and there's a couple of ways to make it. Today we'll do the liquid based method (usually results in clear gravy depending on what you add to it), another day we'll do the fat based method (these are usually the cream/white style gravy).

Step 1: Get your liquid ready. Liquid base gravy starts with a liquid. This can be the juices from a roast, chicken, turkey, ham or broth from a can or water and boullion. I'm using turkey juices. You can strain your juices if you don't like chunks in your gravy. I like mine with everything in it, so I just pull the meat out of the roasting pan and make the gravy right in the pan. If you had a fatty piece of meat, skim some of the fat off the top of the juices with a spoon. Then turn on the burner (this roaster spans 2 burners, so I turn them both on) and heat the juices up. Stir and scrape the good scrappy stuff off the bottom and sides of the pan. Here's the pan of yummy turkey juice:
Step 2: This is optional--sometimes you need it, sometimes not. If you don't have a lot of broth or it is really concentrated, add some water. If I'm making mashed potatoes and they're done, I add potato water to the gravy. Free starchy water with potato goodness in it that otherwise would go down the sink. (Okay, the picture didn't come out so good--hard to get a nice picture when your flash goes off and it's steamy.)

Step 3: Get a cup of COLD water. You can use a glass or plastic measuring cup or just a mug. You don't want anything too tall since you'll be stirring in it. Hot water makes lumps out of the cornstarch.
Step 4: Put a couple of heaping tablespoons of cornstarch into the cup. How much cornstarch you will need will depend on the amount of juice you have. It'll take more starch to thicken up if it's a big ol' pot o' broth. Start with a couple heaping scoops--you can always add more. Stir it up.
Step 5: Pour the cornstarch/water mixture in the boiling broth. Stir it in and bring back to a boil. If, when it's boiling, it's not thick enough, repeat steps 3-5. If it's too thick (I've made batches before that turned out as thick as jelly--oops!) add some water and stir it in.
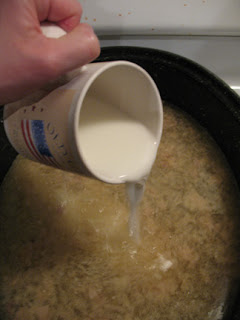
Step 6: Once it's gravy consistency, season to taste. Some gravies need lots of salt, others don't. It will depend on what you started with. If it's going over mashed potatoes, make it a little saltier than you think it should be (the potatoes counteract some of the saltiness). I've fixed up gravy I thought tasted perfect and then had to salt it once it was on the potatoes. Yummy, yummy, yummy gravy. Oh yeah, make sure cornstarch is on your food storage list :)

Enjoy!

Tuesday, December 30, 2008

Finished the Elk and Other Stuff

I know you all are laughing, but it seriously took me until the 27th to be totally finished with that crazy elk! We kept it cold in a cooler outside (well, mostly frozen actually) for a while, then moved a leg or sack of meat in at a time and worked on it. It usually doesn't take that long, but with Christmas stuff going on as well it just drug out forever! Good thing it was so cold out! Anyway, I now have lots of frozen/bottled/jerkied elk meat for the year and I'm ready to do something besides cut up meat!

My sweet sister from Louisiana sent some of her bottled goods for Christmas this year and they are amazing! She likes stuff hot, so made spiced pickled green beans and two kinds of hot sauces (red from habanyeros--not sure how to spell that one--and green from jalapenos) which my husband is loving, and sent a jar of strawberry/cranberry jam for me (I'm not into hot) which is also delicious. I've requested the recipes . . . I'll share if I get around to making them :) She lives in the deep South where pepper plants still produce in January . . . you could seriously can stuff year round there! Anyway, more later, just had to let you all know I did actually finish the elk . . .

Sunday, November 23, 2008

The Grain of Meat

Meat has a grain. Don't get confused and think I'm putting proteins in the grain group here. Meat is obviously not a grain, but meat has a grain like wood does. The grain is the direction the fibers of meat run. Generally the grain runs parallel to the bone, however frequently the grain goes a couple of different directions even within one piece of meat. Usually you can see the grain by looking for lines in the meat. The reason grain is important is because whether you cut with or across the grain affects your meat end product. Here is a chunk of meat. The grain is running generally parallel to the knife blade. If I cut where the knife is, I'm cutting WITH the grain. Same chunk of meat with the knife running perpendicular to the grain. If I cut where the knife is now, I'm cutting ACROSS the grain.
So why does it matter, you ask? Well, cutting across the grain gives you more tender cuts because the long meat fibers are cut into small pieces. Steaks, ham, pork chops, etc. are cut across the grain. Cutting with the grain gives you a tougher piece of meat as the long meat fibers run the length of the piece of meat. I use with the grain (or diagonal to it) for jerky. Across the grain jerky is fine also, it's just a bit too tender for me and doesn't give much chewing satisfaction. So there you have it, next time you bring a roast, ham, steak, etc. home, look it over and see if you can find the grain of the meat.

Thursday, November 20, 2008

Bottled Meat

Bottled meat is one of the best ways to preserve game meat (of course everything I write on this blog is my opinion . . . ) Even if you don't like the taste of venison or elk, you'll be able to eat bottled meat--you honestly can't tell what it is. It takes a long time to make it (mostly processing time in the canner), but when you need to use it, it is already cooked and ready to throw in your casserole, soup, sandwich, etc. Amazing stuff!

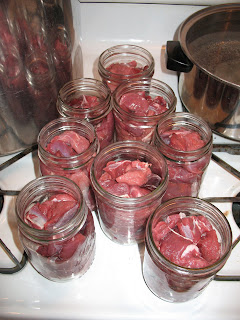
Step 1: Cut your meat up in cubes about 1-1 1/2 inches across. If the pieces are too small they kind of disintegrate and turn to little meat particles in the bottle. Too large and I don't know what would happen, but they wouldn't be as easy to eat when they come out of the bottle. There is a lot of give here--the chunks don't have to be cubes, they don't have to be 1 1/2 inches, pretty much any piece you want will do fine.

The pieces do NOT have to be cleared of all fat, tendon, hard outer meat, etc. All that will soften up in the processing and you won't know it was ever there. Get the big chunks of tendon/fat out, but don't go crazy. The first time I bottled meat I did some really nice cuts and some bottles with cuts from the ribs, neck, etc. with a bunch of tough stuff on them. I marked the bottles, but that was the only way I could tell them apart. All the meat was equally tender and delicious. Strange but true.

Step 2: Put about 1 1/2-2 inches of water in the bottom of your PRESSURE canner with the rack in and turn the burner on med/high to heat it up.
Also put some water on to boil in another pot. AND put your jar lids in a little pot of water and heat them up (no picture, but this is important--if you don't heat your lids you'll get a lot of bottles that lose liquid in the processing and subsequently won't be able to store as long).
Step 3: Put the meat in clean pint jars. Fill them about to the neck. Half pints or quarts would probably work also, I've just never used them. A pint o' meat is about the right size for most things I use it for.
Step 4: Put 1/2 teaspoon canning salt in each pint.
Step 5: Pour boiling water in the jars over the meat and salt and free the air bubbles with your bubble freer (or butter knife). Slide the knife down the edges of the jar in at least 4 locations and use it to push the meat a little--don't skip this step, lots of air gets trapped in these jars. Repeat until the water is to the neck of the jar.
Step 6: Screw the lids and rings on the jars and put them in the canner. Put the lid on the canner and the rocker on the steam pipe and heat to pressure. Process for 55 minutes (yep, that's about an hour) AT 12 lbs pressure. Now, AT pressure just means it needs to be at least 12 lbs pressure for at least 55 minutes. A little fluctuation in the pressure is okay, but if your rocker is going crazy you need to get it cooled down as quick as you can. Don't plan on going anywhere during processing--you'll need to be nearby to turn the heat up and/or down to regulate the pressure.

You might notice a couple of my lids are already marked--they are lids I used on freezer jam so they were never sealed and can be used again to seal a jar of something else (meat in this case). Once a lid has sealed, it can't be used again to seal another jar.
After the 55 minutes of pressure cooking, turn the heat off and let the canner cool down. When it's safe to open you can open it and take the jars out to cool. If you do your meat right before bed, you can go to bed as soon as the 55 minutes are done and the heat is off and just open it and get your jars out in the morning . . .

(We have serious hard water here, so my jars always look like they've got some film on them after bottling meat.)

You now have shelf stable meat that is quick and delicious to use--recipes another time . . .

Cuttin' Up Elk

Well, got the elk to the house last night (already quartered) and put it all in big coolers with ice outside on the north side of the house so it would stay cold. Turned out a pretty cool day so I'm not concerned about it going bad out there. Started in on it this morning--had some help show up, but still only got through one front quarter and one hind quarter along with all my mom duties for the day. And it's not a very big elk either. So tonight I made sure the meat that was still in the coolers wasn't sitting in water from the ice and will tackle the rest tomorrow.

To cut meat, I always cut open a kitchen trash bag and lay it over my counter to put the meat on--lots easier cleanup. Grab your knife, sharpener, cutting board and get to it. The lower legs with all the tendony stuff in them are best for bottled meat or ground up for burger. Above the joint you get some really nice chunks perfect for roasts, steaks, jerky, etc.--just look at your chunk of meat and ask yourself "What does this chunk of meat want to be?" Ha ha ha--just kidding, but it's almost that easy. You actually ask--"What cuts can I get out of this chunk of meat?" Real thin pieces won't make good steaks (steaks are particularly good cut across the grain), but might work for jerky or bottled meat. Some pieces can provide any number of cuts, you just look at the bowls and decide what kind of cut you want more of and start cutting it. I'm only making steaks, jerky, and bottled meat with this elk--those are my 3 favorite ways to eat elk, and I'm in charge of the butcher job, so that's how I'm cutting it.

Here's the hind quarter partly cut up. I have bowls on the counter to put the cut meat in--one for steaks, one for jerky strips, and one for bottled meat chunks. One good "roast" piece can give you some of each cut, so I just sort as I go and pack the meat when the bowls get full or the bone gets empty.


Same hind quarter, turned over, minus the meat--my dog had a good time with this one . . .

Next post . . . bottled meat!

Monday, November 17, 2008

Trout Guts and Fish Heads

Over at a friend's house for bottling butter today and she had a couple of trout she'd been given that were at least 2 days old in her refrigerator. Now, 2 day old trout is okay, but these had not been gutted when they were caught so weren't any good, but we had a little lesson on how to gut a fish anyway. I have to say it was a little strange doing it standing up at a counter instead of kneeling by a creek, but it still worked. Don't get queasy on me here--The Illustrated Guide to Gutting Trout:
Step 1: Turn the fish belly up and get a good hold of it (they're kind of slimy and slippery).

Step 2: Cut from the anus up the middle of the belly to the "V" right behind where the gills come together (about where my left hand is in this picture). A sharp knife of any size will do the trick--you just need to cut through the skin and muscle.

Step 3: Between the jaw and the gills are two soft spots that form a V under the chin. Stick the knife in one side and out the other and cut up so it looks like this:Step 4: Using the hole you just made, grab the jaw in one hand and the lower gill section in the other and pull apart.Step 5: Keep pulling. This will tear off the first pair of bottom fins and pull all the entrails out in one motion.

Last, rinse the inside and outside of the fish and scrape along the inside spine with a fingernail or something else hard and blunt to scrape the majority of the black gunk out. If you are doing this at the river you'll need to wash the fish inside and out again before cooking it when you get to clean water.

At this point, I just cut off the head and cook it with the skin, fins, tail still attached. Season the inside of the fish and then either flour/cornmeal the outside and fry it OR wrap it in tinfoil and bake or barbeque it. Once it is cooked the fins pull out easily taking their bones with them and the meat easily separates from the skeleton of the fish as well--lay the fish on your plate, lift the spine at the neck and tap the meat down with a fork working from the neck to the tail, flip over and repeat. Yummy! I'll have to get some pics of cooked fish and the deboning process when we catch and cook some next . . .

And remember if you've been tossing fish heads into the woods and then decide you need to do some other business out in the same woods, "Check your spot before you squat". ;)

Sunday, November 16, 2008

Easy Jerky from Elk or Deer/Venison

This post has moved to our new blog address--Click here to go straight to the instructions for easy jerky. Thanks!