


That's how much I have going on right now, hence the sparse posting . . .
The seeds I ordered have arrived, plus I dug out some real old "survival garden" non hybrid seeds from my food room and they're going in the garden this year to see how they do. I need seed starter trays and soil (really, I'm a bit behind, but not too far as we don't want to put anything like tomatoes/peppers/etc out until after Mother's Day). I'm hoping I can get those in the town 10 miles away instead of having to go to "town" 45 miles away for them since I've already been to "town" 3 times this last week and never did get them purchased and I really don't have any other plans to get up there in the near future.
Son finally had his eye dr appointment yesterday. The glasses have had to be patched up and re-shaped when he has crashed into his friends or the wall or something, but he's still able to wear them. They only have to last another week or so, so that project has been a success.
I had some plants from Gurney's and Henry Field's that died last year, so I re-ordered them and they got here today while I was on a field trip with the preschool, so I'll be getting those in the ground as soon as possible (hopefully in the morning--tonight I'm supposed to help our youth group paint some bleachers in a neighboring town).
I'm sure there's more, my brain's just fried right now and I need to get down town for T ball signups, so I'll update more when I get a minute to breathe! :)
Tuesday, March 31, 2009
Monday, March 30, 2009
Turning Crystallized Freezer Jam into Edible Jam
One of my finds in the freezer over the weekend was a couple of half pints of cherry freezer jam bottled in '03. I don't know why for sure, but this jam started crystallizing pretty quick after I made it and it has only gotten worse. These are the last 2 jars of it. We ate some a while back and it was "the jam with dots in it", but now the dots have completely taken over the jam, so this is nothing too spectacular, but here's how I made it into jam we could eat instead of throwing it away. Yeah, it's supposed to all be that dark red color . . . the pink is the crystallized stuff.
 I scooped it out of the jars and put it in a little pot on the stove and heated it up. There were ice crystals on the jar lids--I just tossed that stuff and used what was in the jar, but it probably wouldn't make too much difference if there were a little added moisture.
 Brought it to a rolling boil and boiled it until all the sugar/pectin/pink stuff was boiled down, then boiled it a couple of minutes longer.
 Skimmed the foam off the top. I know this looks like a big pot of jam, but it's just close up pictures of a really little pot (remember? only 2 half pints of jam in there?).
Then poured it in a pint jar to put in the fridge. So now it's not freezer jam anymore, it's cooked jam, but it's edible and spreadable which it wasn't when I pulled it out of the freezer. (By the way, I did this on Saturday and it's half gone already . . . didn't turn out too bad!)
Yeah, it's supposed to all be that dark red color . . . the pink is the crystallized stuff.I scooped it out of the jars and put it in a little pot on the stove and heated it up. There were ice crystals on the jar lids--I just tossed that stuff and used what was in the jar, but it probably wouldn't make too much difference if there were a little added moisture.Brought it to a rolling boil and boiled it until all the sugar/pectin/pink stuff was boiled down, then boiled it a couple of minutes longer.Skimmed the foam off the top. I know this looks like a big pot of jam, but it's just close up pictures of a really little pot (remember? only 2 half pints of jam in there?).Then poured it in a pint jar to put in the fridge. So now it's not freezer jam anymore, it's cooked jam, but it's edible and spreadable which it wasn't when I pulled it out of the freezer.
(By the way, I did this on Saturday and it's half gone already . . . didn't turn out too bad!)
Saturday, March 28, 2009
Cleaning Out the Freezer and Ode to My Foodsaver
Spent most of yesterday cleaning out our two freezers. I think Someone's been hearing my grumblings about eating elk for every meal, because in the last two weeks we've been given ground beef (yep real beef, not ground venison or elk) and various cuts of pork from other people's freezer cleanouts. And this last round we had no place in the freezer to put it, so I figured it was time to clean out the real old stuff from the freezers and figure out why we couldn't fit even a jug of ice cream in. It was a cold day, but got it done, and here's the one freezer.  What is that??? A shelf with nothing on it??? Unbelievable! We are cooking up very old elk/moose/buffalo/deer/antelope meat and sausage that is crazy freezer burnt for the dog a little at a time, so I actually had to put some of the old stuff back in on that bottom shelf. Defrosting packs of jerky cut meat plus some old roasts to be cut into jerky, so that will get done in the next day or two.
Now, the Ode to My Foodsaver (and last night's dinner):
Foodsaver, foodsaver, You amazing machine.
You made edible 7 year old beans of green.
8 year old elk steaks were delicious too,
Not all freezer burnt and covered with frosty goo.
And the 2 year old peach pie filling was also yummy--
Quickly devoured into every child's tummy.
Okay, cheesy, I know, but the food packed in my foodsaver kept way better than the food packed by the butcher in the white paper. Just my observations . . .
Now, it's a beautiful day here so I'm going outside to do some yardwork! Have a great weekend! :)
What is that??? A shelf with nothing on it??? Unbelievable! We are cooking up very old elk/moose/buffalo/deer/antelope meat and sausage that is crazy freezer burnt for the dog a little at a time, so I actually had to put some of the old stuff back in on that bottom shelf. Defrosting packs of jerky cut meat plus some old roasts to be cut into jerky, so that will get done in the next day or two.Now, the Ode to My Foodsaver (and last night's dinner):
Foodsaver, foodsaver, You amazing machine.
You made edible 7 year old beans of green.
8 year old elk steaks were delicious too,
Not all freezer burnt and covered with frosty goo.
And the 2 year old peach pie filling was also yummy--
Quickly devoured into every child's tummy.
Thanks for the food found at the freezer's back
That we could still eat thanks to how well you pack.
Okay, cheesy, I know, but the food packed in my foodsaver kept way better than the food packed by the butcher in the white paper. Just my observations . . .
Now, it's a beautiful day here so I'm going outside to do some yardwork! Have a great weekend! :)
Tuesday, March 24, 2009
Great Trials Lie Ahead--Prepare and Have Hope
You know I don't usually wax philosophical on this site or get all gloom and doomy, and I'm still not--you have to watch to the end. This video from David Christenson features words of Latter-day Saint prophets and apostles. If you are LDS (Mormon), you'll know who they are. If you are not LDS, you can choose to believe their messages are inspired or just enjoy a few good speakers--up to you. I debated before posting this as I know many of my readers are not LDS, but I felt the message in the video is worth sharing. Remember--watch it all the way through!!!
Practically Free Garden Weed Barrier
We actually had a couple of days last week warm enough to get outside and accomplish something (I'm kind of a wimp in the cold). I started with my mini herb garden. I only have 3 herbs in it and have had plans on expanding it for at least 2 years, but it just hasn't happened. It's right along the walk up to our house. This little spot was dug out of the lawn, so the lawn just always wants to creep back into it (probably should have dug down at the edges and put some kind of barrier in). It got a little out of hand last year, so this year I'm getting a head start on it. We heard about this little weed beating technique last year and I tried it on my one flower bed and around my baby lilacs and it worked pretty well for keeping weeds down, so I'll be putting it to use again this year.
First I pulled out the majority of weeds and grass (funny how weeds grow before anything useful). Hey, the chives are growing! They're the green spots in the middle. Next I laid down newspaper 3-4 layers thick in a paper mache type of pattern. Use big pieces, and take it all the way to the edges--I tucked some under the rocks, and I'll be putting rocks along the front as well to hold it in place. This is best done on a day without wind ;-). Also get it close to the base of the plants. Newspaper is cheap, biodegrades, and lets air in, unlike black plastic. Our little county newspaper is pretty scrawny, so I've been saving all winter for these projects and I probably still won't have enough for what I want to cover. A few good city Sunday papers would go a long ways . . .
 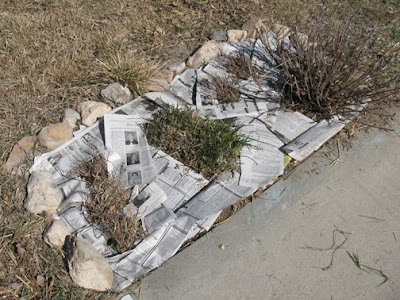 After I got the paper laid down, I wet it so it would stay--the wind always blows here in the spring.
 Last, I put mulch over the paper and watered it again. We have last years grass clippings, but you could use bark or wood chips, or whatever. I'd rather have bark since it would stay put longer with our spring breezes, but hey, I'm cheap . . . I mean frugal and resourceful . . . so I use what I have.
 Voila. Weed barrier on the cheap. This method could easily go larger scale--like for the regular vegetable garden--as long as you have enough newspaper and mulch. This cut WAY down on my weeds last year in the beds I tried it on. I did have to add to the mulch periodically through the growing season so the obituaries didn't show through . . . :)
First I pulled out the majority of weeds and grass (funny how weeds grow before anything useful). Hey, the chives are growing! They're the green spots in the middle.
Next I laid down newspaper 3-4 layers thick in a paper mache type of pattern. Use big pieces, and take it all the way to the edges--I tucked some under the rocks, and I'll be putting rocks along the front as well to hold it in place. This is best done on a day without wind ;-). Also get it close to the base of the plants. Newspaper is cheap, biodegrades, and lets air in, unlike black plastic. Our little county newspaper is pretty scrawny, so I've been saving all winter for these projects and I probably still won't have enough for what I want to cover. A few good city Sunday papers would go a long ways . . . After I got the paper laid down, I wet it so it would stay--the wind always blows here in the spring.Last, I put mulch over the paper and watered it again. We have last years grass clippings, but you could use bark or wood chips, or whatever. I'd rather have bark since it would stay put longer with our spring breezes, but hey, I'm cheap . . . I mean frugal and resourceful . . . so I use what I have.Voila. Weed barrier on the cheap. This method could easily go larger scale--like for the regular vegetable garden--as long as you have enough newspaper and mulch. This cut WAY down on my weeds last year in the beds I tried it on. I did have to add to the mulch periodically through the growing season so the obituaries didn't show through . . . :)
Saturday, March 21, 2009
Free Preparedness Money
Hey all, Choyster Cash is having a giveaway for $100, and you all could use that to buy some preparedness gear or whatever else you want I suppose, but I'd put it toward a shotgun or maybe some food, or something like that if I won it. Head over and take advantange of free money, and if you win, let me know, okay?
Friday, March 20, 2009
Been Busy--Planning and Fixing
If you haven't hit the polls yet, they end tonight, so swing on over to the sidebar and give your answers! Now on to your regularly scheduled post . . .
I think I'm turning into my mother. Not that it's a bad thing, she's amazing. But she has a bunch of chickens, and I just never thought I'd want chickens like I do this spring. So, because we live on almost 2 acres, and were planning on getting pigs this year in addition to our horse, dog and cat, I figured we'd just go all farmy and add chickens to the mix as well. My local (45 mile away) farm and ranch store has chicks already and will continue getting them every week through May, but I can't go get any yet. I need to build something to keep the chicks in AND a coop/run for when they get bigger. We want about a dozen hens, and have some scrap lumber we should be able to piece together a lot of the coop from, so I've been doing some research--well, according to my mom, I've just been asking her a lot of questions--but she sent me a book and some web sites, and here's my favorite site so far for chicken information: http://www.backyardchickens.com/ Amazing amount of information, coop designs, etc. This should be fun.
Also ordered some non-hybrid seeds (I know, I'm a little behind here) and am planning on planting as many of them as possible this year. I'm a little nervous about starting plants like tomatoes, peppers, etc.--I've always just gotten them from the greenhouse, so we'll see how that goes.
Now here's my fixit project for the week: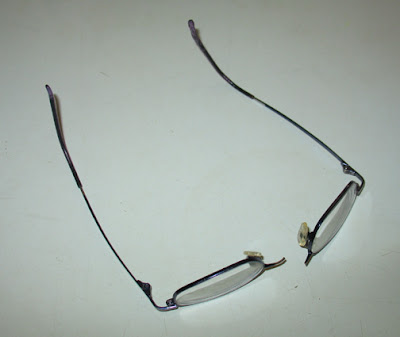 Yep, that's my son's glasses. Ahh . . . active 9 year olds and glasses just don't mix. And these were supposed to be the flex titanium ones that had a lot of bend in them. We're due for an eye exam, so I'm scheduling him another appointment and we'll end up with new glasses then, but in the meantime he's near blind without his glasses, so he can't just go without them, so mom and dad had to come up with some way to stick them back together, and here's what we're trying:
 I actually ended up using a dab of hot glue to hold the two pieces together since JB Weld takes a while to set up. Mixed up some JB Weld--it's like epoxy with metal flakes in it--and gobbed it on the joint. Then added some wire to the mix as a bridge between the two pieces. I ended up using a thicker wire than is in the picture just to add some extra strength. Let the whole contraption set up overnight, and here he was on his way to school this morning:
We'll see how it holds. Hopefully it will last until his new glasses get here . . .
I think I'm turning into my mother. Not that it's a bad thing, she's amazing. But she has a bunch of chickens, and I just never thought I'd want chickens like I do this spring. So, because we live on almost 2 acres, and were planning on getting pigs this year in addition to our horse, dog and cat, I figured we'd just go all farmy and add chickens to the mix as well. My local (45 mile away) farm and ranch store has chicks already and will continue getting them every week through May, but I can't go get any yet. I need to build something to keep the chicks in AND a coop/run for when they get bigger. We want about a dozen hens, and have some scrap lumber we should be able to piece together a lot of the coop from, so I've been doing some research--well, according to my mom, I've just been asking her a lot of questions--but she sent me a book and some web sites, and here's my favorite site so far for chicken information: http://www.backyardchickens.com/ Amazing amount of information, coop designs, etc. This should be fun.
Also ordered some non-hybrid seeds (I know, I'm a little behind here) and am planning on planting as many of them as possible this year. I'm a little nervous about starting plants like tomatoes, peppers, etc.--I've always just gotten them from the greenhouse, so we'll see how that goes.
Now here's my fixit project for the week:
Yep, that's my son's glasses. Ahh . . . active 9 year olds and glasses just don't mix. And these were supposed to be the flex titanium ones that had a lot of bend in them. We're due for an eye exam, so I'm scheduling him another appointment and we'll end up with new glasses then, but in the meantime he's near blind without his glasses, so he can't just go without them, so mom and dad had to come up with some way to stick them back together, and here's what we're trying:I actually ended up using a dab of hot glue to hold the two pieces together since JB Weld takes a while to set up. Mixed up some JB Weld--it's like epoxy with metal flakes in it--and gobbed it on the joint. Then added some wire to the mix as a bridge between the two pieces. I ended up using a thicker wire than is in the picture just to add some extra strength. Let the whole contraption set up overnight, and here he was on his way to school this morning:
We'll see how it holds. Hopefully it will last until his new glasses get here . . .
Tuesday, March 17, 2009
The Polls are Up!
Hi all! I'm running my first ever polls over on the sidebar until Friday night. Just trying to get a feel for where my readers are. At first I thought I would do this for future post ideas, but then I thought, well, I actually have lots of projects coming up, and I'm going to post about whatever I'm doing, so you'll just have to hear about those things anyway regardless of how the poll numbers end up, but I'm still interested in your answers, and it may influence a future post or two ;-). Honestly, if you have any questions or items you'd like me to cover, just shoot me a comment or email and I'll see what I can come up with.
And seriously, hit the polls! They're anonymous, so be honest--I think this will be interesting.
ALSO, feel free to comment here to explain your answers to the poll questions if you want to--some of the answer selections are kind of vague.
And seriously, hit the polls! They're anonymous, so be honest--I think this will be interesting.
ALSO, feel free to comment here to explain your answers to the poll questions if you want to--some of the answer selections are kind of vague.
Monday, March 16, 2009
Save Some Cash--Cut Your Own Kids' Hair!
Sorry for the trouble, but this post has moved to our new blog location. Click here to go straight to Cut Your Own Kids' Hair. Thanks!
Thursday, March 12, 2009
Soap Update and a Warning
The soap is getting slightly harder this evening, so I thought I'd try and get it out of the mold again. I will be lining whatever molds I use next time with butcher paper or wax paper or something--this is ridiculous!
And here's your WARNING: Never use a cheapo knife to try to pry soap out of a gladware container!

And here's your WARNING: Never use a cheapo knife to try to pry soap out of a gladware container!
Soap Making Adventure Part One
I wasn't going to post anything on soap making until I had it figured out a little better, but had such a good laugh at Lisa's recent soap making experience (far too similar to mine!) that I thought I'd post how it's going at this point, which is why it is Part One, and I promise I'll write this up in easy to follow directions when I get a few more pictures of the process.
I watched my mom make soap about a year ago and so have been mulling over doing it myself for a while now. Well, I work at church with a group of 12 and 13 year old girls and we do an activity every week with them and they thought making soap would be fun, so we put it on the calendar. Then I had to find the ingredients, and living out in the boonies, odd ingredients like lye are difficult to come by. In fact, nobody within 45 miles had even contemplated carrying lye in their stores, so I ended up ordering it online from The Lye Guy and paying for hazardous materials shipping to get it here. I figured since I had to pay the hazardous materials fee, I might as well order more than one bottle of the stuff, so I went for his buy 5, get one free deal and now have LOTS of lye. :)
Then I got a recipe online for some lady's favorite soap that had coconut oil, palm oil, cocoa butter, and lye water in it. Lye water--check. Cocoa butter--check (I have this in my lip balm supplies). Coconut oil--checkish--I had some, but would need more to make the amount of soap necessary for 8+ preteen girls to take some home at the end of the activity. Palm oil--big ol' no check, but it just so happened I was going "over the mountain" to the BIG town 2 1/2 hours away and I knew they had a natural foods store so I'd just stop in there and pick some up along with some more coconut oil and maybe a nice scented essential oil since I have peppermint and orange for my lip balm, but that's all and I thought maybe lavender would be nice for soap.
Well, long story short, the natural foods store did NOT carry Palm Oil, and I went home with my coconut oil and lavender oil in a snowstorm and a bit of a panic since the activity was planned for the next night and I had already told the girls we'd be making soap and to come with their safety glasses, rubber gloves, and apron--how could I possibly dissapoint them? So I called my mom in the morning (good thing for moms), and she said I didn't need Palm Oil--it was very expensive if I could even find it, and I could use lard instead--it's real cheap and lathers well and I could just get it at the grocery store. Oh. Okay. Well, not MY grocery store, so I had to drive 10 miles to the next slightly larger grocery store where they did have it but hiding in the meat cooler section, so the soap making activity was officially on for that evening.
I got my girls all together and we got started and as I'm telling them how to measure the ingredients on the scale in some bowl that was left in the church kitchen, one of them pipes up and says, "Have you ever done this before?" How dare they doubt my authority??? ;) Uhhhh, well, not exactly, but I've seen it done . . .
Here's the recipe we ended up using:
16 oz Coconut Oil
16 oz Olive Oil
32 oz Lard
24 oz Water
9 oz Lye
Lavender essential oil
First we measured out the water and the lye on my handy postal scale and slowly mixed the lye into the water. Then we real quick opened the window in the kitchen and half the girls left the room coughing from the fumes. Outside would be better . . . or under your range hood with your fan that vents to the outside, not like my range hood that vents right back into the kitchen.
The Lye water gets really hot, so we moved it over by the open window to cool down and hoping for fewer fumes that way.
Next, we measured the oils into somebody else's bowl (good thing they left it there) on the scale so we knew how many ounces we had.
Then we put all the oils except the lavender into my fancy double boiler setup (big frying pan with water in it, big pot inside with oils in it) and heated it up. Sometimes you just have to make things up. The idea is to get the lye water and the oils at 110 degrees or thereabouts at the SAME TIME. Now I used my meat thermometer to check the temperature and I only have one, so we had to keep checking and washing and checking and washing so we didn't mix any lye water with the oils prematurely. Of course we heated our oils too hot and had them about 125 when our lye had cooled off to about 115 so in a panic we put cold water in our big frying pan and added some ice hoping to cool the oils off quickly, meantime spilling water all over the stove top when we put the pot of oils in it. Magically, the oils cooled off to 110 about the same time the lye hit 110, so then we slowly added the lye water to the oils and mixed it up.
You can mix them by hand, but apparently it takes a very long time, so I used my mom's method and mixed it with an electric stir stick like you use for making milkshakes (you can kind of see it at the far left of the "measuring oils" picture above). Only forgot to let go of the button as I was lifting it up once and got oil/lyewater mess on my pants and shoes (of course it missed my apron completely). After about 15-20 minutes with the stir stick, 3/4 of the girls had left to play in the gym and the soap finally reached "trace" which is where it leaves a line or scar looking thing if you drip some soap on the top of itself. It's about hot pudding consistency at this point. This is where you add any extras like essential oils, rose petals, whatever you want to fancy it up.
Then we poured it into little cheapo gladware containers so the girls could all take some soap home and wrapped them in towels to keep them from cooling off too quickly. I told them to pop the soap out of the molds in 24 hours and then let it cure for 4-6 weeks. Well, this morning (it's been at least 36 hours) I tried to pop my soap out of my gladware and it is stuck in there like nothing else! So I knifed around the edge and it still won't come out. So I called my mom again and she said do not panic, just give it some more time to harden and it will come out. Phew. I haven't gotten any calls from my girls that their soap wouldn't come out, so either they figured out how to get theirs out or they've forgotten what's in that little towel bundle by their bed . . .

At any rate, I'm planning on making soap again with my prep ladies group, so I'll take more pictures then (did I mention I was trying to keep track of a bunch of 12-13 year olds AND take pictures this time?). And I'll keep you posted on the soap progress.
Wednesday, March 11, 2009
Embroidery for Generations
Embroidery has been around for ages. Really. Have you seen some of the fancy stitching on clothing from the 1700's? What? You haven't? That's only my favorite clothing era, so okay, I'll show you some. Click here for one example, and here for an amazing embroidered wedding gown. And embroidery was around before that as well. Samples can be found from Ancient Egypt, China, Persia, India and England. And it's been around in my family for almost that long . . . I think. Well, at least my mom knows how to do it and her mom taught her, and she learned from her mom. So I'm assuming it's been around a while. My mom taught me some basics, but I never did much with it. Time to repent.
I was talking with my mom a week or so ago and she said that when she and her brothers were sick, her mom would draw them a cartoon character on a piece of material and let them embroider. Yep, her and her brothers. In fact, when my uncle joined the service he was handed his uniform, patches, and a needle and thread and made money off the other servicemen by sewing their patches on for them.
Well, long story short, my kids needed something to do the other day, and being inspired by my conversation with my mom, I dug out my embroidery floss, needles, and little hoops. Found some muslin and after a quick tutorial, got the girls started in on their first embroidery project. We're just doing the backstitch--real simple--like this:
 My son was almost interested. Maybe another day. Youngest worked on it for a while with mom's help, but lost interest pretty quick--she's only 4. My older daughter really took to it. She's had a great time picking out floss colors and stitching away. I'm still tying knots for her, but we'll get there.
 She took it with her in the car, and to school today. And she said, "I can teach this to my kids and they can teach their kids and it can go on for gena . . la . . yens . . or something."
 There you have it, well on her way to embroidering a fancy schmancy wedding dress. But not too soon . . . :)
Tuesday, March 10, 2009
Sunday Morning Emergency Syrup
Every Sunday morning we have what we call Puffy Oven Pancakes--I've also heard them more commonly called German pancakes. You know, 6 eggs, 1 cup flour, 1 cup milk all mixed up and baked in a melted butter lined pan. MMmmmmm. Well, maybe we don't have them EVERY Sunday, but if we don't I get a lot of complaining and asking where the Puffy Oven Pancakes are. So this last Sunday I was mixing up the pancakes when I noticed that our bottle of syrup was quite low and I knew I'd just emptied the big jug the last time I filled that bottle up. To not have enough syrup to eat the puffy oven pancakes constitutes a real emergency around here.
Now, I'm not one to go shopping on Sunday and even if I wanted to there isn't a store open for 10 miles, and the pancakes were already in the oven, so I had to come up with some kind of syrup quick.
So braving the dangers of my food room, I went in and got a quart of Apricot nectar that I had bottled in 2004. This apricot nectar is on the "Hurry Up And Rotate Me" list as it is starting to go dark, so needed to be used anyway. I put the nectar in a pot and using my jam and candy making experience I tossed in 6 cups of sugar. Seriously, I just thought that was about the amount I'd use if I were making jam with that much liquid fruit, so it was just a guess. Then I stirred it all together and heated it up.
 Brought it to a rolling boil for 2 minutes (again, just a guess based on jam and candy making).
 After I took it off the heat, I scooped some in a little bowl and put it in the fridge so it would cool down faster (I knew it would thicken as it cooled). By now my pancakes were done, so I only left it in the fridge for a few minutes while I got the table set and the family gathered. It turned out fantastic! The kids still wanted the regular syrup, but me and dad had delicious apricot syrup on our puffy oven pancakes. I poured the rest into a quart and a pint jar and put them in the fridge for next time. The syrup turned out kind of dark since the nectar was kind of dark to start with.
 I was going to take a picture of my lovely syrup poured over a piece of pancake, but alas, it all got eaten before I got the camera out and all that was left was this:

Now, I'm not one to go shopping on Sunday and even if I wanted to there isn't a store open for 10 miles, and the pancakes were already in the oven, so I had to come up with some kind of syrup quick.
So braving the dangers of my food room, I went in and got a quart of Apricot nectar that I had bottled in 2004. This apricot nectar is on the "Hurry Up And Rotate Me" list as it is starting to go dark, so needed to be used anyway. I put the nectar in a pot and using my jam and candy making experience I tossed in 6 cups of sugar. Seriously, I just thought that was about the amount I'd use if I were making jam with that much liquid fruit, so it was just a guess.
Then I stirred it all together and heated it up.Brought it to a rolling boil for 2 minutes (again, just a guess based on jam and candy making).After I took it off the heat, I scooped some in a little bowl and put it in the fridge so it would cool down faster (I knew it would thicken as it cooled). By now my pancakes were done, so I only left it in the fridge for a few minutes while I got the table set and the family gathered. It turned out fantastic! The kids still wanted the regular syrup, but me and dad had delicious apricot syrup on our puffy oven pancakes. I poured the rest into a quart and a pint jar and put them in the fridge for next time. The syrup turned out kind of dark since the nectar was kind of dark to start with. I was going to take a picture of my lovely syrup poured over a piece of pancake, but alas, it all got eaten before I got the camera out and all that was left was this:
Thursday, March 5, 2009
Gotta Love the Versatility of Home Canning!
We home can lots of stuff around here, but here's one I've never tried before. My kids did this canning, but I'll say right now, there are better ways than this to "preserve" your childhood memories! 


Tuesday, March 3, 2009
Wax Coated Cheese
Also check the Waxing Cheese Update posted 1/14/10 here.
Did you know you can store cheese in your food storage without a refrigerator or freezer? Well, you can--at least that's what I was told by a lady in the food storage know, so of course I had to test it for myself (remember the sprouted wheat and the butter?).
Here's the short version: You can coat cheese in wax (approx 4 layers) and store it on a shelf, or you can buy Tillamook cheese and just stick it on the shelf since it's already in airtight, vacuum packed packaging. Start with mild as the cheese will age on the shelf and become quite sharp.
Now, on with my experience. Sometime last fall before I started this blog, I got myself a 5 lb block of cheese and proceeded to coat chunks of it in parafin wax. I tied cotton string around it and dipped it in a can of melted wax, then used a clean paintbrush to touch up the spots that didn't cover as well with the dipping. It ended up something like this. So now about 3-4 months later a friend of mine who also had tried to wax cheese said she checked hers and it was all moldy, so I got my cheese box out and checked my cheese and 5 of my 12 pieces had minor molding. The other 7 looked great. The molding was all where the string came out of the wax at the top. Hmmmm. Obviously a trouble spot. Since the molding was very minimal, I opted to cut it off and re-wax those spots on the cheese and put it back in storage rather than toss the entire chunk of cheese.
  So I cut off the strings and cut off the moldy spot much deeper than the mold actually looked like it was.
 Then, using my parafin wax double boiler setup and my wax-brush (so dubbed after I first used it for waxing the cheese) I proceeded to repaint wax over the open cheese. This is NOT junk wax like I'd use for the egg carton firestarters. This is good clean parafin wax right out of the box from the store--it's going on my FOOD, I want good wax. Put on at least 4 layers--nice and thick. You can re-use the wax when you use the cheese, so it's not a one time use type of thing.
 In the future, I will cut off the strings when I'm done waxing the cheese and paint over the spots where the strings exited the wax a number of times to ensure a good seal. Or for the cost of less expensive cheese and wax and time involved, maybe I'll just wait for Tillamook cheese to go on sale and buy that instead . . .
Pretty quick fix anyway. I put the cheese back in the box and we'll check on it again in a few months. :)
Don't forget to click Comments and keep reading! :)
Did you know you can store cheese in your food storage without a refrigerator or freezer? Well, you can--at least that's what I was told by a lady in the food storage know, so of course I had to test it for myself (remember the sprouted wheat and the butter?).
Here's the short version: You can coat cheese in wax (approx 4 layers) and store it on a shelf, or you can buy Tillamook cheese and just stick it on the shelf since it's already in airtight, vacuum packed packaging. Start with mild as the cheese will age on the shelf and become quite sharp.
Now, on with my experience. Sometime last fall before I started this blog, I got myself a 5 lb block of cheese and proceeded to coat chunks of it in parafin wax. I tied cotton string around it and dipped it in a can of melted wax, then used a clean paintbrush to touch up the spots that didn't cover as well with the dipping. It ended up something like this.
So now about 3-4 months later a friend of mine who also had tried to wax cheese said she checked hers and it was all moldy, so I got my cheese box out and checked my cheese and 5 of my 12 pieces had minor molding. The other 7 looked great. The molding was all where the string came out of the wax at the top. Hmmmm. Obviously a trouble spot. Since the molding was very minimal, I opted to cut it off and re-wax those spots on the cheese and put it back in storage rather than toss the entire chunk of cheese. So I cut off the strings and cut off the moldy spot much deeper than the mold actually looked like it was. Then, using my parafin wax double boiler setup and my wax-brush (so dubbed after I first used it for waxing the cheese) I proceeded to repaint wax over the open cheese. This is NOT junk wax like I'd use for the egg carton firestarters. This is good clean parafin wax right out of the box from the store--it's going on my FOOD, I want good wax. Put on at least 4 layers--nice and thick. You can re-use the wax when you use the cheese, so it's not a one time use type of thing.
 In the future, I will cut off the strings when I'm done waxing the cheese and paint over the spots where the strings exited the wax a number of times to ensure a good seal. Or for the cost of less expensive cheese and wax and time involved, maybe I'll just wait for Tillamook cheese to go on sale and buy that instead . . .
 Pretty quick fix anyway. I put the cheese back in the box and we'll check on it again in a few months. :)
Don't forget to click Comments and keep reading! :)
Monday, March 2, 2009
Homemade All Natural Lip Balm
Here it is, the post you've all been waiting for (even though you didn't realize it). The almost fully illustrated guide to making your own lip balm for WAAAYYY LESS than $2.50 a tube or whatever the going rate is.
Start by eating some canned goods. Seriously. Just a small can--like a veggie can--we ate green beans, but you can have whatever you want. A soup can would work fine also, although the ones with the pop off tops might be a bit more difficult to shape. After you've emptied your can, wash it out and bend the edge of it into a spout like this: Now gather the rest of your supplies. The recipe I use is fairly versatile, so you can choose and alternate ingredients. Here's the recipe:
20% Beeswax
25% Solid at room temperature oil (Coconut Oil, Palm Oil, Shea Butter, Lanolin, etc.)
15% Brittle at room temperature oil (Cocoa Butter, Palm Kernel Oil, etc.)
40% Liquid at room temperature (Sweet Almond Oil, Olive Oil, Avocado Oil, etc.)
Essential oil of your choice
You'll also need a scale, a small pot with water, and containers for your lip balm. I have a postal scale, but you can use whatever scale you have that will measure small weights. And for the containers, Google "lip balm tubes" and you'll find places that sell them. They are like chap stick tubes. I purchased mine some time ago and can't remember where I got them, but they had a great deal on a gross of them (yep 144) so I bought that and let me tell you, it takes a while to use 144 lip balm tubes! You can also find little pots if you prefer that type of application.
All the measurements are by weight, you can do any amount and measure in any weight increment (ounces, grams, pounds, etc.)
Today, I'm making about 2 oz. of lip balm and putting it in tubes. The tubes hold approx. 0.15 oz each.
So after you eat your veggies and get your ingredients and supplies together, it's time to begin. Put a bit of water in the pan and put it on the stove to heat up.
 You can measure the ingredients separately and add them to your can, or you can just measure them into your can. If I have helpers, I put a paper cup on the scale and have them measure out the right amount of each ingredient separately, then add them all together, but today, I'm just measuring right into the can. So I put my can on the scale and zeroed the weight so it will only be weighing the ingredients.
 Next I added the beeswax. You can also get beeswax online, or maybe your health food store has it. I got mine from my mom who bought a big ol chunk of it and had plenty of excess to share with her daughter. Beeswax is extremely hard, so you may end up with shavings instead of a slice and that's okay because it melts faster if it's in little pieces. I wanted 0.4 oz of beeswax for my recipe and put in 0.5 oz because I like my lip balm just a little more solid :)
It really doesn't matter in what order you add your ingredients, so I'm just going in the order I happened to add them. Next, add the solid at room temperature oil--I used Coconut Oil. It's just what I had. All these oils can be found at your local natural foods store type place, and some even at your standard grocer. I added 0.5 oz. + Okay, the scale says the total now is 1.1 oz., so maybe I added 0.6 oz.
 Next add the brittle at room temperature oil--I used Cocoa Butter. It smells yummy--kind of like chocolate--mmmmmm.
 Would have been 0.3 if I did my recipe just right, but again, I added a little over. (My scale has an auto reset after a certain time--that's why it shows 0.4 oz instead of the total weight which would have been 1.5 oz at this point).
 Next add your liquid at room temperature oil--I used olive oil.
 Now I was trying to make it a little stiffer than this recipe had made in the past, so I went a little light on the olive oil and probably only put in 0.7 oz instead of 0.8. You see, the recipe is not set in stone.
 Add your favorite essential oil. I used peppermint. About 10 drops per ounce of lip balm, so I added about 20 drops.
 At this point you could also add a bit of vitamin E, which I couldn't find at the time I made this, so I left it out. When I do add it, I just poke the end of one or two of the vitamin E capsules with a pin and squeeze the oil into the can.
Yea! Happy Lips! :)
Start by eating some canned goods. Seriously. Just a small can--like a veggie can--we ate green beans, but you can have whatever you want. A soup can would work fine also, although the ones with the pop off tops might be a bit more difficult to shape. After you've emptied your can, wash it out and bend the edge of it into a spout like this:
Now gather the rest of your supplies. The recipe I use is fairly versatile, so you can choose and alternate ingredients. Here's the recipe:20% Beeswax
25% Solid at room temperature oil (Coconut Oil, Palm Oil, Shea Butter, Lanolin, etc.)
15% Brittle at room temperature oil (Cocoa Butter, Palm Kernel Oil, etc.)
40% Liquid at room temperature (Sweet Almond Oil, Olive Oil, Avocado Oil, etc.)
Essential oil of your choice
You'll also need a scale, a small pot with water, and containers for your lip balm. I have a postal scale, but you can use whatever scale you have that will measure small weights. And for the containers, Google "lip balm tubes" and you'll find places that sell them. They are like chap stick tubes. I purchased mine some time ago and can't remember where I got them, but they had a great deal on a gross of them (yep 144) so I bought that and let me tell you, it takes a while to use 144 lip balm tubes! You can also find little pots if you prefer that type of application.
All the measurements are by weight, you can do any amount and measure in any weight increment (ounces, grams, pounds, etc.)
Today, I'm making about 2 oz. of lip balm and putting it in tubes. The tubes hold approx. 0.15 oz each.
So after you eat your veggies and get your ingredients and supplies together, it's time to begin.
Put a bit of water in the pan and put it on the stove to heat up.You can measure the ingredients separately and add them to your can, or you can just measure them into your can. If I have helpers, I put a paper cup on the scale and have them measure out the right amount of each ingredient separately, then add them all together, but today, I'm just measuring right into the can. So I put my can on the scale and zeroed the weight so it will only be weighing the ingredients.Next I added the beeswax. You can also get beeswax online, or maybe your health food store has it. I got mine from my mom who bought a big ol chunk of it and had plenty of excess to share with her daughter. Beeswax is extremely hard, so you may end up with shavings instead of a slice and that's okay because it melts faster if it's in little pieces. I wanted 0.4 oz of beeswax for my recipe and put in 0.5 oz because I like my lip balm just a little more solid :)It really doesn't matter in what order you add your ingredients, so I'm just going in the order I happened to add them. Next, add the solid at room temperature oil--I used Coconut Oil. It's just what I had. All these oils can be found at your local natural foods store type place, and some even at your standard grocer.
I added 0.5 oz. + Okay, the scale says the total now is 1.1 oz., so maybe I added 0.6 oz.Next add the brittle at room temperature oil--I used Cocoa Butter. It smells yummy--kind of like chocolate--mmmmmm.Would have been 0.3 if I did my recipe just right, but again, I added a little over. (My scale has an auto reset after a certain time--that's why it shows 0.4 oz instead of the total weight which would have been 1.5 oz at this point).Next add your liquid at room temperature oil--I used olive oil.Now I was trying to make it a little stiffer than this recipe had made in the past, so I went a little light on the olive oil and probably only put in 0.7 oz instead of 0.8. You see, the recipe is not set in stone.Add your favorite essential oil. I used peppermint. About 10 drops per ounce of lip balm, so I added about 20 drops.At this point you could also add a bit of vitamin E, which I couldn't find at the time I made this, so I left it out. When I do add it, I just poke the end of one or two of the vitamin E capsules with a pin and squeeze the oil into the can.Now, put your can into the pot of water and let it heat up and melt all the oils. You can stir it if you want to help it melt--I usually do. I kind of like things to happen NOW if at all possible.
While the oils are melting, get your lip balm containers ready. I like to put mine on a paper towel--I know how good I am at pouring and I'll probably over fill one or two tubes and have lip balm all over the counter . . .  When the stuff in the can is all melted, take the can out of the pot. It will be hot--use an oven mitt.
 The can cools off pretty quick, so then you can just grab it at the top and pour the liquid into the tubes.
 I filled these to the top, but if you fill them a little less, you can come back and top it off before it hardens and get a flatter top.

When the stuff in the can is all melted, take the can out of the pot. It will be hot--use an oven mitt.The can cools off pretty quick, so then you can just grab it at the top and pour the liquid into the tubes.I filled these to the top, but if you fill them a little less, you can come back and top it off before it hardens and get a flatter top. As the lip balm hardens, it kind of sinks in the middle. If you want it all pretty and smooth on top, you'll need to top it off. It's best to do that by not filling it quite all the way the first time and then topping when it's not quite all cooled off. Your lip balm will also start to harden in the can as you're pouring. If it gets too hard, just put the can back in the pot of water and melt it again.

Once it is all cooled off, put your lids on your tubes and voila! Fancy schmancy lip balm! If you're real fancy, you can work up some kind of label for your tubes. I just don't bother with that, but if you made more than one variety at a time, you might want to label them somehow so you'd know what you were about to put on your lips . . . 
Yea! Happy Lips! :)
Subscribe to:
Posts (Atom)
