


Showing posts with label tips n tricks. Show all posts
Showing posts with label tips n tricks. Show all posts
Thursday, December 9, 2010

Friday, August 13, 2010
Travel Tips for Surviving the Family Road Trip
We've got a road trip planned next week. We're cheap/frugal/poor, so we don't usually fly anywhere, we just go places within driving distance. We do road trips more often than anything. We also don't have a TV/DVD in the car and our kids don't have Nintendo DS's, mp3's, or anything electronic. And usually we all arrive unscathed. Well, at least we're all still alive when we get there. So before we leave, here's a few tips to help your family survive those long road trips.

Here are a couple of ways to save some cash on your trip:
1. Stay with family or friends. We'll be gone 7 days and only one night is in a hotel. Hotels aren't cheap. Even cheap hotels aren't cheap. Especially when you have to leave in the middle of the night after finding bed bugs crawling on your pillows and check into a nicer hotel. Yep, done it.
Family or friends are usually glad to offer you a place to stay if they know you're coming through town, and sometimes they'll even feed you! And even if they can't have you stay, it's a good idea to stop and visit with them so they don't hear on Facebook that you came through their town and didn't even call! Don't be totally cheap here, do offer to pay for food, help with chores, or whatever they might need while you are there. And of course offer to return the favor if they're ever in your area.
2. Pack food and snacks. Make some cookies before you go. Or rice crispy treats. Or muffins. Try to avoid foods that get smashed or melt easily. Taking the family out to eat three times a day for a week will add a TON of money to your travel costs. Plan on eating out a few times, but pack some sandwich stuff, bagels and yogurt for breakfast, and snacks so you don't have to buy everything on the road. You might even pack a camp stove and some Mountain House meals. If it's a long trip, usually half way through you can hit a grocery store for more bread, fruit, etc. You'll want to re-stock the ice in the cooler anyway, and it's still cheaper than eating out.
3. Don't drive the gas guzzler. This may sound like a given, but if you're taking a camping trip, maybe the roads are good enough to drive your car instead of your suburban. Give it a thought before loading up the big ol' beast and spending three times as much for gas.
And now for some ideas to keep the kids from killing each other in the car.
1. Play classic games like I Spy, 20 Questions, etc. One we like is "I'm going on a picnic" where we take turns saying things we'll take on our picnic--one for each letter of the alphabet. Then each turn you have to remember everybody else's picnic items before adding the next letter item. Fun. With smaller kids you can do this one and skip having to recite all the other letter items. You can twist up I Spy by using colors, "starts with" some letter, or using things inside or outside the vehicle (I Spy outside in a Wyoming snowstorm using colors is pretty limited, but add the inside of the car and things get a bit better).
2. Write every passenger's name on one car tire with sidewalk chalk before you leave. Every time you stop, see whose name is on the top of the tire. Celebrate with a treat or something or just keep a count of who ends up on the top the most.
3. Play telephone. Or have one person write a word with their finger on the next person's arm and pass the word that way across the seat. Have the last person guess what the original word was. OR write letters on each other's backs and guess what they are. It's harder than it sounds.
4. Get a map of where you are going. If you're ahead of the game, you can order maps from each state's tourism department. Otherwise, buy a map. If you've got an "Are we there yet?" kid, this is $5 well spent. Mark your route. Have them navigate or count towns or answer questions about where we are.
5. Plan some surprises. My mom would circle random towns on the trip and when we got to that town she'd pull a "Razzle Dazzle Travel Gift" out of the trunk. These were things like a treat, or a small toy, lego kit, something to keep us busy for a while and break up the monotony. A couple of my favorites were plastic army men and rubber bands so we could set them up and shoot them down (in a van before the days of seatbelt laws) and bubbles we could use with the air conditioner vents. Total driver distractions, but SO fun as a kid. You can probably come up with things that aren't so dangerous ;)
5. Stop at rest stops and let the kids run around. Yes, this adds time to your trip, but kids need exercise! You can read the Historical marker while they run around the car 29 times.
6. Take some magazines. Crossword puzzles or word searches for the older kids. Other game magazines are good also. Magazines and books to read are also good if your kids don't get carsick. One game that kept our kids busy for hours used a magazine and a sticker. Stick the sticker somewhere in the magazine and have the kid find it. They might want to place the sticker somewhere else and have you find it (if you're not driving) or you can just re-stick it somewhere different for them to find or have them hide it for each other.
7. Sing songs. Get a handful of CD's or load up your ipod with music you all can enjoy and sing away. The people driving next to you won't notice, I promise. Well, unless you have your windows down.
8. Give the kids a pencil and paper and let them draw what they see or write notes or draw monsters or whatever. As simple as this is, it has been a lifesaver on some of our trips. One paper game we played was where one person drew the head of a monster and folded the paper over, then the next person drew a body and they got to open it and look at their creation and laugh. Kept them busy for quite a while.
9. Do some research about where you are traveling, or have the kids do some and be the tour guide.
10. Play license plate games. Find a license plate from as many states as possible and keep a list. Make words from the letters on a license plate. So if the plate is 142MNY, you could use MNY to make a word like MoNeY or you could use MNY to make a phrase like My New Yucca.
11. Let the kids take their pillows, stuffed animals, etc. and have blankets available for enforced quiet time in the car. You'll probably need some. We usually offer some reward for so many minutes of silence. It's totally worth it.
Just so you know, these are not fail proof. We still have the "she's touching me" and "he's breathing my air" times. But we're a lot better equipped to handle them if we've got an arsenal of activities and ideas to keep boredom at bay in the car.
I will be gone next week celebrating 15 sweet years with my hubby and a couple of birthdays and the end of summer break, but still have posts scheduled that I'm sure you'll enjoy, so be sure to check back in. We'll be playing I Spy. :)

Here are a couple of ways to save some cash on your trip:
1. Stay with family or friends. We'll be gone 7 days and only one night is in a hotel. Hotels aren't cheap. Even cheap hotels aren't cheap. Especially when you have to leave in the middle of the night after finding bed bugs crawling on your pillows and check into a nicer hotel. Yep, done it.
Family or friends are usually glad to offer you a place to stay if they know you're coming through town, and sometimes they'll even feed you! And even if they can't have you stay, it's a good idea to stop and visit with them so they don't hear on Facebook that you came through their town and didn't even call! Don't be totally cheap here, do offer to pay for food, help with chores, or whatever they might need while you are there. And of course offer to return the favor if they're ever in your area.
2. Pack food and snacks. Make some cookies before you go. Or rice crispy treats. Or muffins. Try to avoid foods that get smashed or melt easily. Taking the family out to eat three times a day for a week will add a TON of money to your travel costs. Plan on eating out a few times, but pack some sandwich stuff, bagels and yogurt for breakfast, and snacks so you don't have to buy everything on the road. You might even pack a camp stove and some Mountain House meals. If it's a long trip, usually half way through you can hit a grocery store for more bread, fruit, etc. You'll want to re-stock the ice in the cooler anyway, and it's still cheaper than eating out.
3. Don't drive the gas guzzler. This may sound like a given, but if you're taking a camping trip, maybe the roads are good enough to drive your car instead of your suburban. Give it a thought before loading up the big ol' beast and spending three times as much for gas.
And now for some ideas to keep the kids from killing each other in the car.
1. Play classic games like I Spy, 20 Questions, etc. One we like is "I'm going on a picnic" where we take turns saying things we'll take on our picnic--one for each letter of the alphabet. Then each turn you have to remember everybody else's picnic items before adding the next letter item. Fun. With smaller kids you can do this one and skip having to recite all the other letter items. You can twist up I Spy by using colors, "starts with" some letter, or using things inside or outside the vehicle (I Spy outside in a Wyoming snowstorm using colors is pretty limited, but add the inside of the car and things get a bit better).
2. Write every passenger's name on one car tire with sidewalk chalk before you leave. Every time you stop, see whose name is on the top of the tire. Celebrate with a treat or something or just keep a count of who ends up on the top the most.
3. Play telephone. Or have one person write a word with their finger on the next person's arm and pass the word that way across the seat. Have the last person guess what the original word was. OR write letters on each other's backs and guess what they are. It's harder than it sounds.
4. Get a map of where you are going. If you're ahead of the game, you can order maps from each state's tourism department. Otherwise, buy a map. If you've got an "Are we there yet?" kid, this is $5 well spent. Mark your route. Have them navigate or count towns or answer questions about where we are.
5. Plan some surprises. My mom would circle random towns on the trip and when we got to that town she'd pull a "Razzle Dazzle Travel Gift" out of the trunk. These were things like a treat, or a small toy, lego kit, something to keep us busy for a while and break up the monotony. A couple of my favorites were plastic army men and rubber bands so we could set them up and shoot them down (in a van before the days of seatbelt laws) and bubbles we could use with the air conditioner vents. Total driver distractions, but SO fun as a kid. You can probably come up with things that aren't so dangerous ;)
5. Stop at rest stops and let the kids run around. Yes, this adds time to your trip, but kids need exercise! You can read the Historical marker while they run around the car 29 times.
6. Take some magazines. Crossword puzzles or word searches for the older kids. Other game magazines are good also. Magazines and books to read are also good if your kids don't get carsick. One game that kept our kids busy for hours used a magazine and a sticker. Stick the sticker somewhere in the magazine and have the kid find it. They might want to place the sticker somewhere else and have you find it (if you're not driving) or you can just re-stick it somewhere different for them to find or have them hide it for each other.
7. Sing songs. Get a handful of CD's or load up your ipod with music you all can enjoy and sing away. The people driving next to you won't notice, I promise. Well, unless you have your windows down.
8. Give the kids a pencil and paper and let them draw what they see or write notes or draw monsters or whatever. As simple as this is, it has been a lifesaver on some of our trips. One paper game we played was where one person drew the head of a monster and folded the paper over, then the next person drew a body and they got to open it and look at their creation and laugh. Kept them busy for quite a while.
9. Do some research about where you are traveling, or have the kids do some and be the tour guide.
10. Play license plate games. Find a license plate from as many states as possible and keep a list. Make words from the letters on a license plate. So if the plate is 142MNY, you could use MNY to make a word like MoNeY or you could use MNY to make a phrase like My New Yucca.
11. Let the kids take their pillows, stuffed animals, etc. and have blankets available for enforced quiet time in the car. You'll probably need some. We usually offer some reward for so many minutes of silence. It's totally worth it.
Just so you know, these are not fail proof. We still have the "she's touching me" and "he's breathing my air" times. But we're a lot better equipped to handle them if we've got an arsenal of activities and ideas to keep boredom at bay in the car.
I will be gone next week celebrating 15 sweet years with my hubby and a couple of birthdays and the end of summer break, but still have posts scheduled that I'm sure you'll enjoy, so be sure to check back in. We'll be playing I Spy. :)
Wednesday, June 30, 2010
Krazy Glue for Your First Aid Supplies
I had a friend write with an idea for 72 hour kits or first aid kits. Her son fell about 9 feet out of a tree onto the cement edge of their pond and got a nasty gash by his eye and a concussion. After getting it all cleaned up and disinfected, a neighbor who also happens to be a nurse gave them some of this to close the cut up.

Krazy Glue? Seriously. If you've ever gotten this stuff on your fingers, you know how well it sticks skin together. And the individual use tubes are perfect--you probably also know how well a big tube of Krazy Glue glues itself shut after one use. The nurse friend told them super glue was invented for the purpose of closing skin. Their son did have to take a trip to the doctor to get the concussion checked out, he's doing much better and the cut is reportedly healing nicely.
I know when we had our daughter fall and cut her chin, the emergency room glued it together. They probably used one of these mini tubes of Krazy Glue and charged us a fortune for it. Definitely would have been cheaper to do that one ourselves! It would be worth picking a few of these up and having them handy in your first aid kits or emergency kits.
How about you? Ever used a form of super glue to glue a wound shut?

Krazy Glue? Seriously. If you've ever gotten this stuff on your fingers, you know how well it sticks skin together. And the individual use tubes are perfect--you probably also know how well a big tube of Krazy Glue glues itself shut after one use. The nurse friend told them super glue was invented for the purpose of closing skin. Their son did have to take a trip to the doctor to get the concussion checked out, he's doing much better and the cut is reportedly healing nicely.
I know when we had our daughter fall and cut her chin, the emergency room glued it together. They probably used one of these mini tubes of Krazy Glue and charged us a fortune for it. Definitely would have been cheaper to do that one ourselves! It would be worth picking a few of these up and having them handy in your first aid kits or emergency kits.
How about you? Ever used a form of super glue to glue a wound shut?
Wednesday, June 23, 2010
Homemade Laundry Detergent Dispenser
Here's a great little gadget my mom discovered for storing and pouring her homemade laundry soap--the Coffee Mate creamer bottle. They are pretty sturdy little bottles with a nice flip top lid and pour spout. If you don't drink coffee, maybe you have a friend who would save a couple for you. They fit nicely in the laundry cupboard also, better than the squatty plastic gladware bowl I was using.

And I've altered my recipe since the first post on it--here's the new one:
1 bar Fels Naptha soap shredded
1 bar Ivory shredded
2 cups washing soda
3 cups borax
That's it--almost the same as before. I still use the generic crystal light drink mix tub to measure the amount for a load of wash--it is about 2 tablespoons. I heap it and that's good for a load. One batch of the above recipe lasts about a month around here.
Now off to do some more laundry. :)

And I've altered my recipe since the first post on it--here's the new one:
1 bar Fels Naptha soap shredded
1 bar Ivory shredded
2 cups washing soda
3 cups borax
That's it--almost the same as before. I still use the generic crystal light drink mix tub to measure the amount for a load of wash--it is about 2 tablespoons. I heap it and that's good for a load. One batch of the above recipe lasts about a month around here.
Now off to do some more laundry. :)
Thursday, May 27, 2010
Food Grade Buckets on the Cheap
Sorry for the trouble, but this post has moved to our new blog address. Click here to go straight to Food Grade Buckets on the Cheap. Thanks!
Wednesday, February 10, 2010
Kids Prep Minute: Code Words
Here's a quick one to think about with your kids. If mom was unavailable to come get you and she had to send someone you didn't know to pick you up from school/ball practice/whatever, how would you know they were safe to go with? Well, they'll know the secret code word (or phrase) of course. When we were growing up, we made up a crazy secret code phrase. It is hilarious and nobody could come up with it if they weren't told it, but it would be hard to forget once you heard it. Perfect. Never had to use it. I know you're dying to know what it was, but I can't give it away here because it's a SECRET code word! Come up with some phrase that your kids and you can remember in an emergency situation. Then if anyone comes up to your kids and says their mom needs help and they are suppposed to get in that person's car right now, they'll know to run the other way if they don't hear the code word.
Another place a code word could be used is in an event that requires kids going straight to a safe room in the house or dropping and hiding where they are. Then if it is an intruder at the door, he won't know what you're yelling "BLUE PICKLES" for, but the kids will get the message and do what they need to do.
This code word could also be something you could "text" to your kids if they have cell phones. The key is that the code word enacts a plan that you have already made.
Think up times when your family might need to communicate something without letting the whole world know what you mean (think "Alas, Babylon"), or might need a "password" for security reasons. Come up with some good memorable code words for your family, and by all means, don't tell me what they are! ;)
Another place a code word could be used is in an event that requires kids going straight to a safe room in the house or dropping and hiding where they are. Then if it is an intruder at the door, he won't know what you're yelling "BLUE PICKLES" for, but the kids will get the message and do what they need to do.
This code word could also be something you could "text" to your kids if they have cell phones. The key is that the code word enacts a plan that you have already made.
Think up times when your family might need to communicate something without letting the whole world know what you mean (think "Alas, Babylon"), or might need a "password" for security reasons. Come up with some good memorable code words for your family, and by all means, don't tell me what they are! ;)
Saturday, December 12, 2009
Making the Perfect Christmas Tree
We like to hunt our own Christmas tree. No, not from a lot or from the store--from the woods. Besides being a fun activity for everybody (even the dog), it's cheap. Only $10 for a tree permit. And you know I'm cheap. Granted, if the snow isn't too deep we can easily spend that much more in gas to get to the top of the mountain where the pines are, but this year we stayed close and picked up a Pinyon pine instead. This one.


Our ceilings aren't very tall, so our tree doesn't need to be very tall. We figured out last year that instead of tying it to the top of the suburban in the cold, we could just stuff it inside with the kids and the dog and be on our way. So that's what we did. (It's on a tarp so it doesn't sap up the whole vehicle.)

The thing about real trees is that they're rarely perfect. They have holes and flat sides. The branches aren't spaced evenly around. They're a little fatter or skinnier than you thought once you get them in your house. You know. So here's what we do. We cut the tree too tall, so when we get home we have to take another foot or so off the bottom. With that go a couple of branches. We use those branches to fill in the empty spots on the tree. Just whip out your screw gun and put a couple screws in each branch. Like this:

Then for the branches that need to move over or be pulled out of the walk way we use fishing line to tie them where we want them. Like this:

Light it up and decorate it (can you believe this little tree took 400 lights?), and voila, the perfect Christmas tree!

Tuesday, March 24, 2009
Practically Free Garden Weed Barrier
We actually had a couple of days last week warm enough to get outside and accomplish something (I'm kind of a wimp in the cold). I started with my mini herb garden. I only have 3 herbs in it and have had plans on expanding it for at least 2 years, but it just hasn't happened. It's right along the walk up to our house. This little spot was dug out of the lawn, so the lawn just always wants to creep back into it (probably should have dug down at the edges and put some kind of barrier in). It got a little out of hand last year, so this year I'm getting a head start on it. We heard about this little weed beating technique last year and I tried it on my one flower bed and around my baby lilacs and it worked pretty well for keeping weeds down, so I'll be putting it to use again this year.
First I pulled out the majority of weeds and grass (funny how weeds grow before anything useful). Hey, the chives are growing! They're the green spots in the middle. Next I laid down newspaper 3-4 layers thick in a paper mache type of pattern. Use big pieces, and take it all the way to the edges--I tucked some under the rocks, and I'll be putting rocks along the front as well to hold it in place. This is best done on a day without wind ;-). Also get it close to the base of the plants. Newspaper is cheap, biodegrades, and lets air in, unlike black plastic. Our little county newspaper is pretty scrawny, so I've been saving all winter for these projects and I probably still won't have enough for what I want to cover. A few good city Sunday papers would go a long ways . . .
 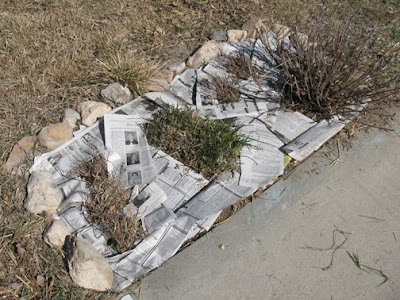 After I got the paper laid down, I wet it so it would stay--the wind always blows here in the spring.
 Last, I put mulch over the paper and watered it again. We have last years grass clippings, but you could use bark or wood chips, or whatever. I'd rather have bark since it would stay put longer with our spring breezes, but hey, I'm cheap . . . I mean frugal and resourceful . . . so I use what I have.
 Voila. Weed barrier on the cheap. This method could easily go larger scale--like for the regular vegetable garden--as long as you have enough newspaper and mulch. This cut WAY down on my weeds last year in the beds I tried it on. I did have to add to the mulch periodically through the growing season so the obituaries didn't show through . . . :)
First I pulled out the majority of weeds and grass (funny how weeds grow before anything useful). Hey, the chives are growing! They're the green spots in the middle.
Next I laid down newspaper 3-4 layers thick in a paper mache type of pattern. Use big pieces, and take it all the way to the edges--I tucked some under the rocks, and I'll be putting rocks along the front as well to hold it in place. This is best done on a day without wind ;-). Also get it close to the base of the plants. Newspaper is cheap, biodegrades, and lets air in, unlike black plastic. Our little county newspaper is pretty scrawny, so I've been saving all winter for these projects and I probably still won't have enough for what I want to cover. A few good city Sunday papers would go a long ways . . . After I got the paper laid down, I wet it so it would stay--the wind always blows here in the spring.Last, I put mulch over the paper and watered it again. We have last years grass clippings, but you could use bark or wood chips, or whatever. I'd rather have bark since it would stay put longer with our spring breezes, but hey, I'm cheap . . . I mean frugal and resourceful . . . so I use what I have.Voila. Weed barrier on the cheap. This method could easily go larger scale--like for the regular vegetable garden--as long as you have enough newspaper and mulch. This cut WAY down on my weeds last year in the beds I tried it on. I did have to add to the mulch periodically through the growing season so the obituaries didn't show through . . . :)
Monday, March 16, 2009
Save Some Cash--Cut Your Own Kids' Hair!
Sorry for the trouble, but this post has moved to our new blog location. Click here to go straight to Cut Your Own Kids' Hair. Thanks!
Thursday, March 12, 2009
Soap Update and a Warning
The soap is getting slightly harder this evening, so I thought I'd try and get it out of the mold again. I will be lining whatever molds I use next time with butcher paper or wax paper or something--this is ridiculous!
And here's your WARNING: Never use a cheapo knife to try to pry soap out of a gladware container!

And here's your WARNING: Never use a cheapo knife to try to pry soap out of a gladware container!
Tuesday, March 10, 2009
Sunday Morning Emergency Syrup
Every Sunday morning we have what we call Puffy Oven Pancakes--I've also heard them more commonly called German pancakes. You know, 6 eggs, 1 cup flour, 1 cup milk all mixed up and baked in a melted butter lined pan. MMmmmmm. Well, maybe we don't have them EVERY Sunday, but if we don't I get a lot of complaining and asking where the Puffy Oven Pancakes are. So this last Sunday I was mixing up the pancakes when I noticed that our bottle of syrup was quite low and I knew I'd just emptied the big jug the last time I filled that bottle up. To not have enough syrup to eat the puffy oven pancakes constitutes a real emergency around here.
Now, I'm not one to go shopping on Sunday and even if I wanted to there isn't a store open for 10 miles, and the pancakes were already in the oven, so I had to come up with some kind of syrup quick.
So braving the dangers of my food room, I went in and got a quart of Apricot nectar that I had bottled in 2004. This apricot nectar is on the "Hurry Up And Rotate Me" list as it is starting to go dark, so needed to be used anyway. I put the nectar in a pot and using my jam and candy making experience I tossed in 6 cups of sugar. Seriously, I just thought that was about the amount I'd use if I were making jam with that much liquid fruit, so it was just a guess. Then I stirred it all together and heated it up.
 Brought it to a rolling boil for 2 minutes (again, just a guess based on jam and candy making).
 After I took it off the heat, I scooped some in a little bowl and put it in the fridge so it would cool down faster (I knew it would thicken as it cooled). By now my pancakes were done, so I only left it in the fridge for a few minutes while I got the table set and the family gathered. It turned out fantastic! The kids still wanted the regular syrup, but me and dad had delicious apricot syrup on our puffy oven pancakes. I poured the rest into a quart and a pint jar and put them in the fridge for next time. The syrup turned out kind of dark since the nectar was kind of dark to start with.
 I was going to take a picture of my lovely syrup poured over a piece of pancake, but alas, it all got eaten before I got the camera out and all that was left was this:

Now, I'm not one to go shopping on Sunday and even if I wanted to there isn't a store open for 10 miles, and the pancakes were already in the oven, so I had to come up with some kind of syrup quick.
So braving the dangers of my food room, I went in and got a quart of Apricot nectar that I had bottled in 2004. This apricot nectar is on the "Hurry Up And Rotate Me" list as it is starting to go dark, so needed to be used anyway. I put the nectar in a pot and using my jam and candy making experience I tossed in 6 cups of sugar. Seriously, I just thought that was about the amount I'd use if I were making jam with that much liquid fruit, so it was just a guess.
Then I stirred it all together and heated it up.Brought it to a rolling boil for 2 minutes (again, just a guess based on jam and candy making).After I took it off the heat, I scooped some in a little bowl and put it in the fridge so it would cool down faster (I knew it would thicken as it cooled). By now my pancakes were done, so I only left it in the fridge for a few minutes while I got the table set and the family gathered. It turned out fantastic! The kids still wanted the regular syrup, but me and dad had delicious apricot syrup on our puffy oven pancakes. I poured the rest into a quart and a pint jar and put them in the fridge for next time. The syrup turned out kind of dark since the nectar was kind of dark to start with. I was going to take a picture of my lovely syrup poured over a piece of pancake, but alas, it all got eaten before I got the camera out and all that was left was this:
Monday, February 23, 2009
Make Your Own Homemade Survival Bars
Sorry for the trouble, but this post has moved to our new blog location. Click here to go straight to Make Your Own Homemade Survival Bars. Thanks!
Thursday, February 12, 2009
Practically Free Egg Carton Dryer Lint Firestarters
Now I know after you read my firestarting post you wanted some of the egg carton firestarters for yourself, didn't you? Well, I'll sell you some of mine, or you can just make some of your own for almost no cost!
First, get your egg carton and collect your dryer lint by cleaning off the lint trap of your dryer. DO NOT throw it away (I actually feel bad throwing dryer lint in the trash anymore!). Next, stuff the dryer lint in the egg carton where the eggs used to be. If you don't do a lot of laundry, this may take a while to fill a carton, if you're like me and washing clothes all the time, I can fill a whole dozen with a full day's laundry. It doesn't have to be packed in tight.
 Now, here's the tricky part because I don't have pictures since the last time I actually did this was a few months ago even though I'm due to do it again because I have a bunch of egg cartons full of lint waiting to be waxed (total run on sentence--just like how I talk).
Here's what you'll need:
Dryer lint--any variety will do.
Egg carton--doesn't matter if it's a dozen, 18 or the "flats" as long as it's the pressed paper kind, NOT styrofoam or whatever else they might make egg cartons out of.
Wax--from old candles, crayons, or buy parafin wax at the store (although it's cheaper to buy cheapo big candles for this job--it doesn't have to be food grade wax).
A sense of adventure--just kidding, if you didn't have that already you wouldn't be here!
First, get your egg carton and collect your dryer lint by cleaning off the lint trap of your dryer. DO NOT throw it away (I actually feel bad throwing dryer lint in the trash anymore!).
Next, stuff the dryer lint in the egg carton where the eggs used to be. If you don't do a lot of laundry, this may take a while to fill a carton, if you're like me and washing clothes all the time, I can fill a whole dozen with a full day's laundry. It doesn't have to be packed in tight.Now, here's the tricky part because I don't have pictures since the last time I actually did this was a few months ago even though I'm due to do it again because I have a bunch of egg cartons full of lint waiting to be waxed (total run on sentence--just like how I talk).Set up a double boiler to melt your wax. You need a pot with water in it, and a can of some kind (I like the big V-8, tomato juice, apple juice, pineapple juice cans). Your can must be METAL and fit inside your pot of water with room to spare around it. Do not use a smaller pot that you like (or that is part of your double boiler setup) as your can--you'll be melting wax in it and will likely ruin it!
Put your wax in the can and the can in the pot of water and heat the water. The wax will melt inside the can.
When the wax is melted, scoop or pour it onto the lint in the egg carton. You'll want to put your egg carton on something that the wax can leak through onto (like waxed paper or cardboard or something you don't care about) because some of the wax will soak through the egg carton. When you're done waxing the lint, let it cool and harden and voila! Cheapo fire starters!
You can leave them all together in the shape of an egg carton and then tear them off one at a time, or tear them all apart and store them separately. They won't light with a spark, so you'll need matches or a lighter to get them burning. Throw some in your emergency kit, car kit, camping kit, whatever else kit you have that has matches in it. In our fire test, one of these little babies burned for 17 minutes and put out a good flame sufficient for even fire novices to get something burning with!
So now, what do you say to some eggs for breakfast and a day of laundry? :)
Friday, February 6, 2009
Sprouted Wheat Experiment
I had heard from a very reputable source in the food storage community that if you stored your wheat/beans/seeds in cans or buckets and used the oxygen absorber packets it would kill the germination ability of the seed and make it so it would not sprout. Well, knowing how important it is to be able to sprout my food for nutrition, I've had some specially packed without the oxygen absorbers (oxy packs). Well, a post over at M.D. Creekmore's Survivalist Blog got me thinking about this information and I thought I'd better test it out. So here's the experiment, plus the basics on sprouting wheat since I haven't covered that on this blog yet.
 I put one cup of each wheat in a bowl and labeled them "plain" and "oxypacked". Covered the wheat at least double with cool water and let it soak. I started around noon on Wednesday. The seeds should soak "overnight". So if you start it before bed, you can move on to the next step in the morning, but if you start in the morning, they're done soaking by then end of the day.
 That evening, I drained the water off, rinsed the wheat and put it in sprouting trays. There are lots of containers you could use to sprout wheat, I just happen to like these trays better than using a jar or something like that. The seeds need to get air or they'll mold, but not too much air or they'll dry out.
 Then I put the lids on the trays and put them in a dark cupboard.
 I rinsed and drained the wheat in the trays again the next morning (Thursday), and returned them to the cupboard. By that evening, the wheat was already sprouting (the tray on the left has already had a handful taken out for tasting).
 Here's the plain wheat at the end of approx. 36 hours:
 And the Oxy packed wheat at the same time:
 The little white things at the ends of the wheat are the beginnings of the sprouts. Both trays of wheat were sprouting. You could stop here and eat them, but I like my sprouts just a little longer so I rinsed them again and put them back in the cupboard for the night. Late this morning (Friday) I pulled them out and here's what I have. Plain wheat after about 48 hours (including soaking time):
 Oxygen packed wheat after approx. 48 hours (including soaking time):
 Now, it appears that the oxygen packed wheat actually is sprouting better than the tupperware stored wheat, most likely due to freshness. I do not recommend storing wheat in tupperware for any long period of time as it is not airtight, I just figured I'd use what was sitting around in my storage room open first for this experiment.
The Wheat I used was white wheat. One batch has been stored in an orange tupperware for who knows how long. The second batch was packed in a mylar bag in 2002 with an oxygen absorber packet.
I put one cup of each wheat in a bowl and labeled them "plain" and "oxypacked". Covered the wheat at least double with cool water and let it soak. I started around noon on Wednesday. The seeds should soak "overnight". So if you start it before bed, you can move on to the next step in the morning, but if you start in the morning, they're done soaking by then end of the day.That evening, I drained the water off, rinsed the wheat and put it in sprouting trays. There are lots of containers you could use to sprout wheat, I just happen to like these trays better than using a jar or something like that. The seeds need to get air or they'll mold, but not too much air or they'll dry out.Then I put the lids on the trays and put them in a dark cupboard.I rinsed and drained the wheat in the trays again the next morning (Thursday), and returned them to the cupboard. By that evening, the wheat was already sprouting (the tray on the left has already had a handful taken out for tasting).And the Oxy packed wheat at the same time:The little white things at the ends of the wheat are the beginnings of the sprouts. Both trays of wheat were sprouting. You could stop here and eat them, but I like my sprouts just a little longer so I rinsed them again and put them back in the cupboard for the night. Late this morning (Friday) I pulled them out and here's what I have. Plain wheat after about 48 hours (including soaking time):Oxygen packed wheat after approx. 48 hours (including soaking time):Now, it appears that the oxygen packed wheat actually is sprouting better than the tupperware stored wheat, most likely due to freshness. I do not recommend storing wheat in tupperware for any long period of time as it is not airtight, I just figured I'd use what was sitting around in my storage room open first for this experiment.So the "advice" from an expert was proved incorrect. Kind of like the butter! Guess you really have to test stuff out for yourself sometimes!
For reference, 1 cup of dry wheat berries yielded 1 3/4 + cups sprouted wheat.
Sunday, January 11, 2009
Sharpies are my Friends
 Yep, Sharpies. Little permanent markers--not too thick, not too thin--that can write on almost anything! In my storage, I use my sharpies mostly for recording dates on items. Of course you can use a pencil and paper and write it all down in a notebook, it just wouldn't be as easy. When you purchase something you are planning to store or planning to use, or you bottle, dry, or freeze something, sharpie the date on it--just get your sharpie out when you bring the groceries home and mark the stuff as you put it away. Then mark it again when you get it out to use it if applicable. Dating your storage stuff serves a few different purposes.
 First is rotation. You'll always know which bottle of oil is the oldest if they all have the date of purchase on them.
Second, you'll find out how long things last. Because I date my stuff, I know I can use canola oil that is 4 years old and it will be okay as long as the bottle was sealed the whole time.
Third, you'll find out how long it takes you/your family to use something. When you know how long something lasts at your house, you can calculate how many of that item you will need for a 3 month, 6 month, year, or longer supply. Keep in mind that items like oil/flour/shortening you will use more of in a survival situation as you won't be supplementing with convenience foods at that time, so better to overestimate than underestimate. AND items like shampoo you will likely use less of than you do now (bummer).
Here's my current shortening can. The red date is the date I bought it and the black date is the date I opened it.
 Some things like toilet paper can't be sharpied, so a pencil and paper to keep track of those items would work. DO keep a notebook with your calculations in it--this I have not done and I wish I had (I guess I honestly thought I could keep track of it all in my brain . . . duh!). So I'll be re-dating some items I know I have already calculated and writing it all down for my notebook this time! Happy Marking! :)
Subscribe to:
Posts (Atom)


